#概要
本文共分为个阶段,每个阶段完成后都可以看到阶段性成果。
阶段一、显示Menu Bar小图标。
阶段二、隐藏程序窗口和启动栏图标。(无图)
阶段三、点击MenuBar小图标,出现菜单。
阶段四、点击MenuBar小图标,出现一个小窗口。
阶段五、通过事件监听鼠标点击,“智能”关闭小窗口。
#阶段一
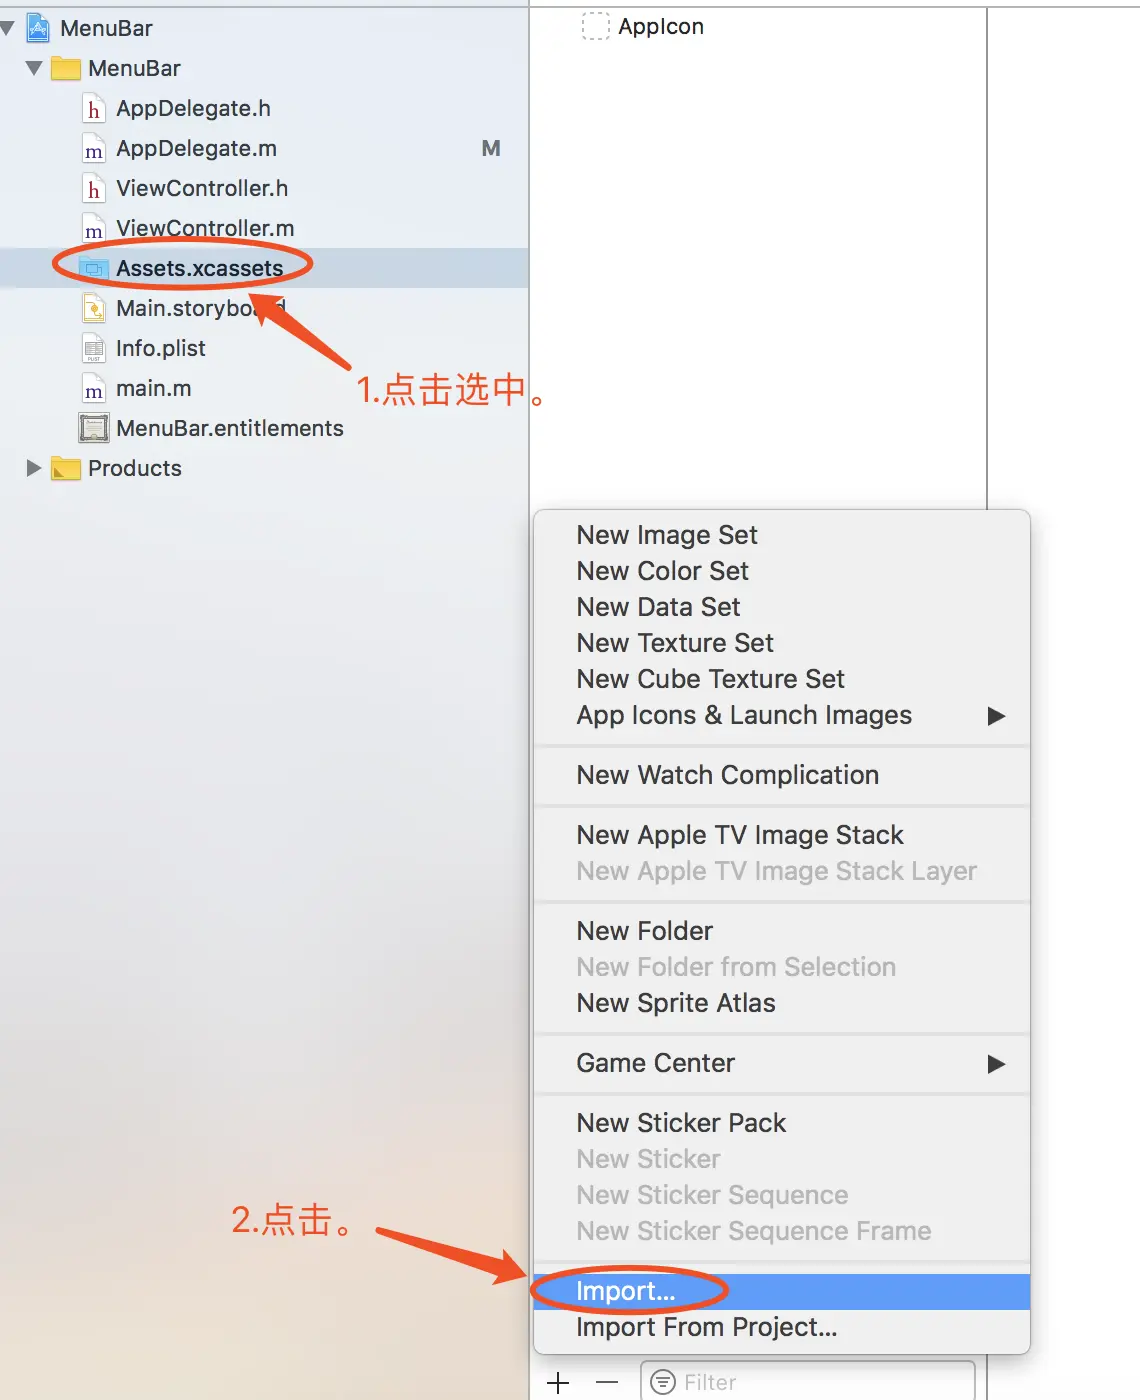
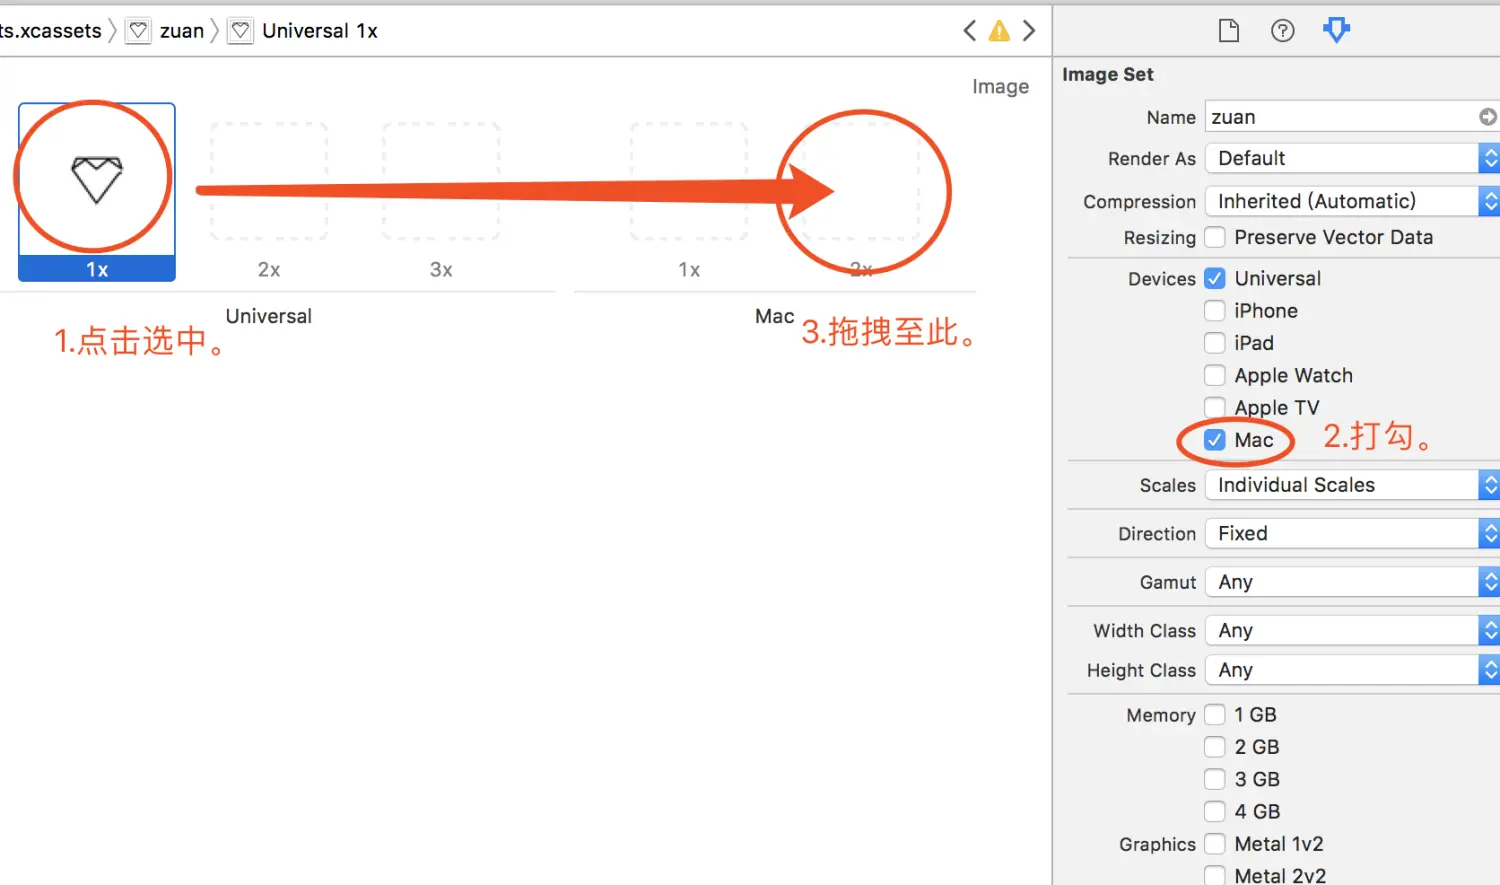
1.创建工程,向工程中加入图标,对图标资源进行设置。

2.在AppDelegate.h中添加NSStatusItem类型的指针变量,对其进行初始化操作,定义一个getDiamond函数。
1
2
3
4
5
6
7
8
9
10
11
12
13
14
15
16
17
18
19
20
21
22
23
24
25
26
27
28
29
30
31
32
33
34
35
| //AppDelegate.m
#import "AppDelegate.h"
@interface AppDelegate ()
@property NSStatusItem *statusItem;
- (void) getDiamond:(NSStatusBarButton *)sender;
@end
@implementation AppDelegate
- (void)applicationDidFinishLaunching:(NSNotification *)aNotification {
// Insert code here to initialize your application
//初始化_statusItem
_statusItem = [[NSStatusBar systemStatusBar] statusItemWithLength:NSVariableStatusItemLength];
//设置_statusItem按钮相关信息
NSStatusBarButton *button = _statusItem.button;
if(button){
button.image = [NSImage imageNamed:@"zuan"];
button.action = @selector(getDiamond:);
}
}
- (void) getDiamond:(NSStatusBarButton *)sender {
NSLog(@"You get a lot of diamonds!");
}
- (void)applicationWillTerminate:(NSNotification *)aNotification {
// Insert code here to tear down your application
}
@end
|
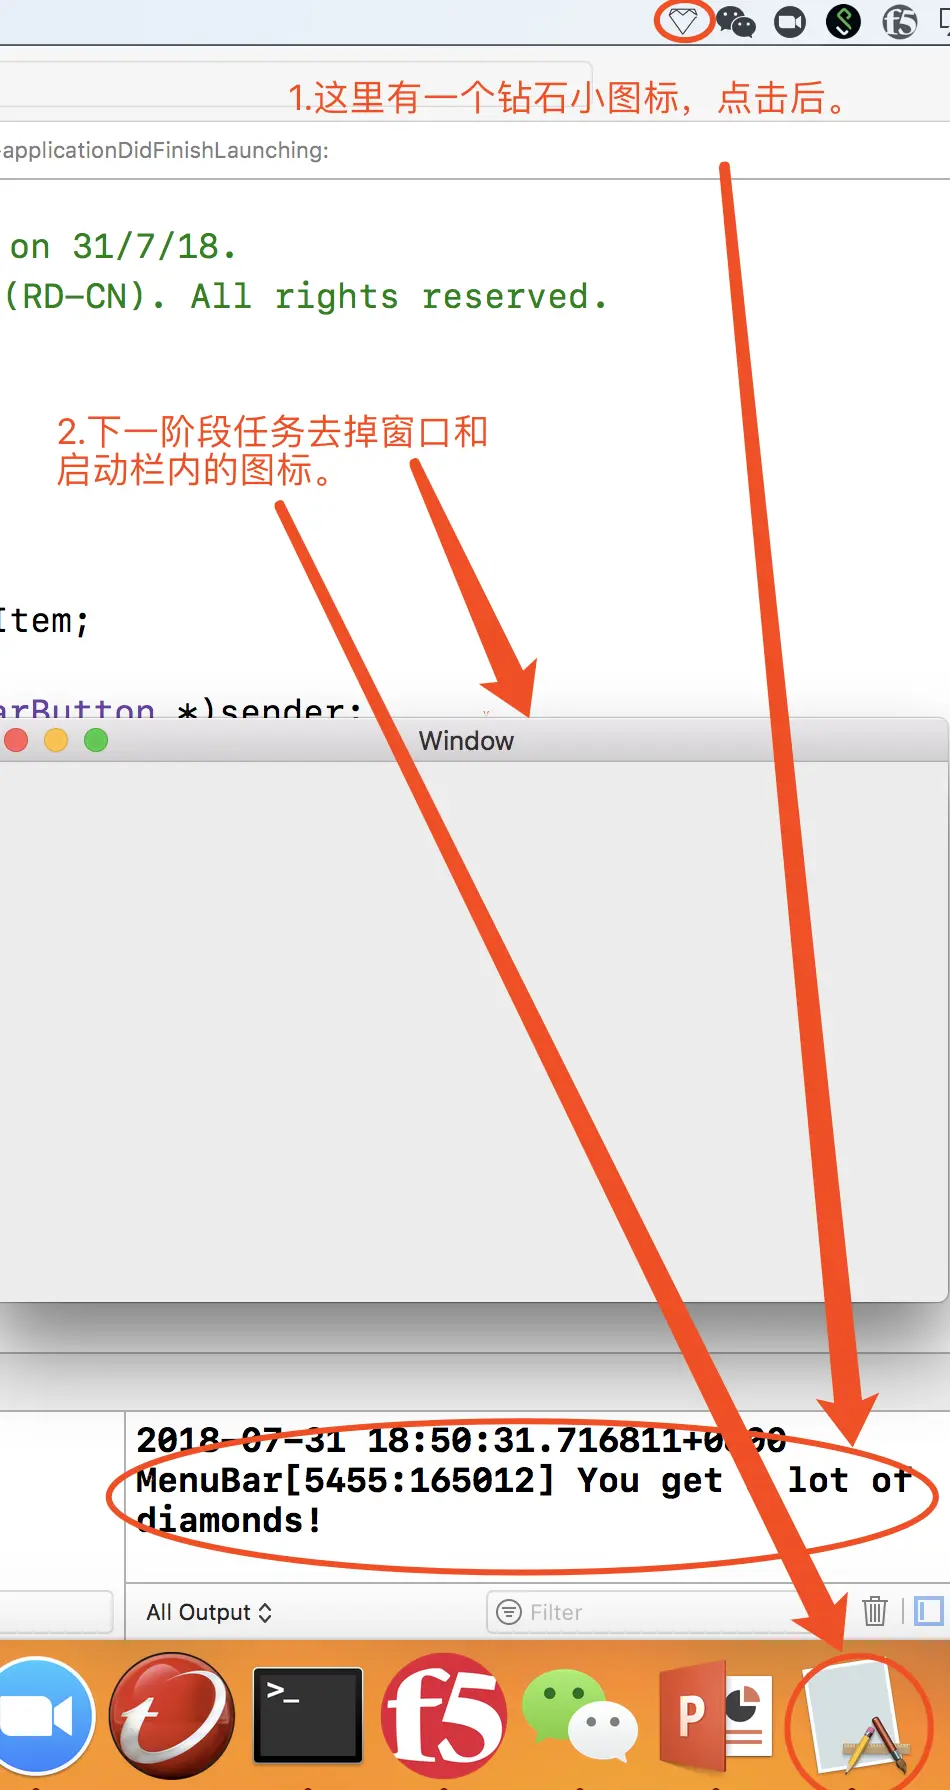
3.Command+R运行,效果如下。
#阶段二
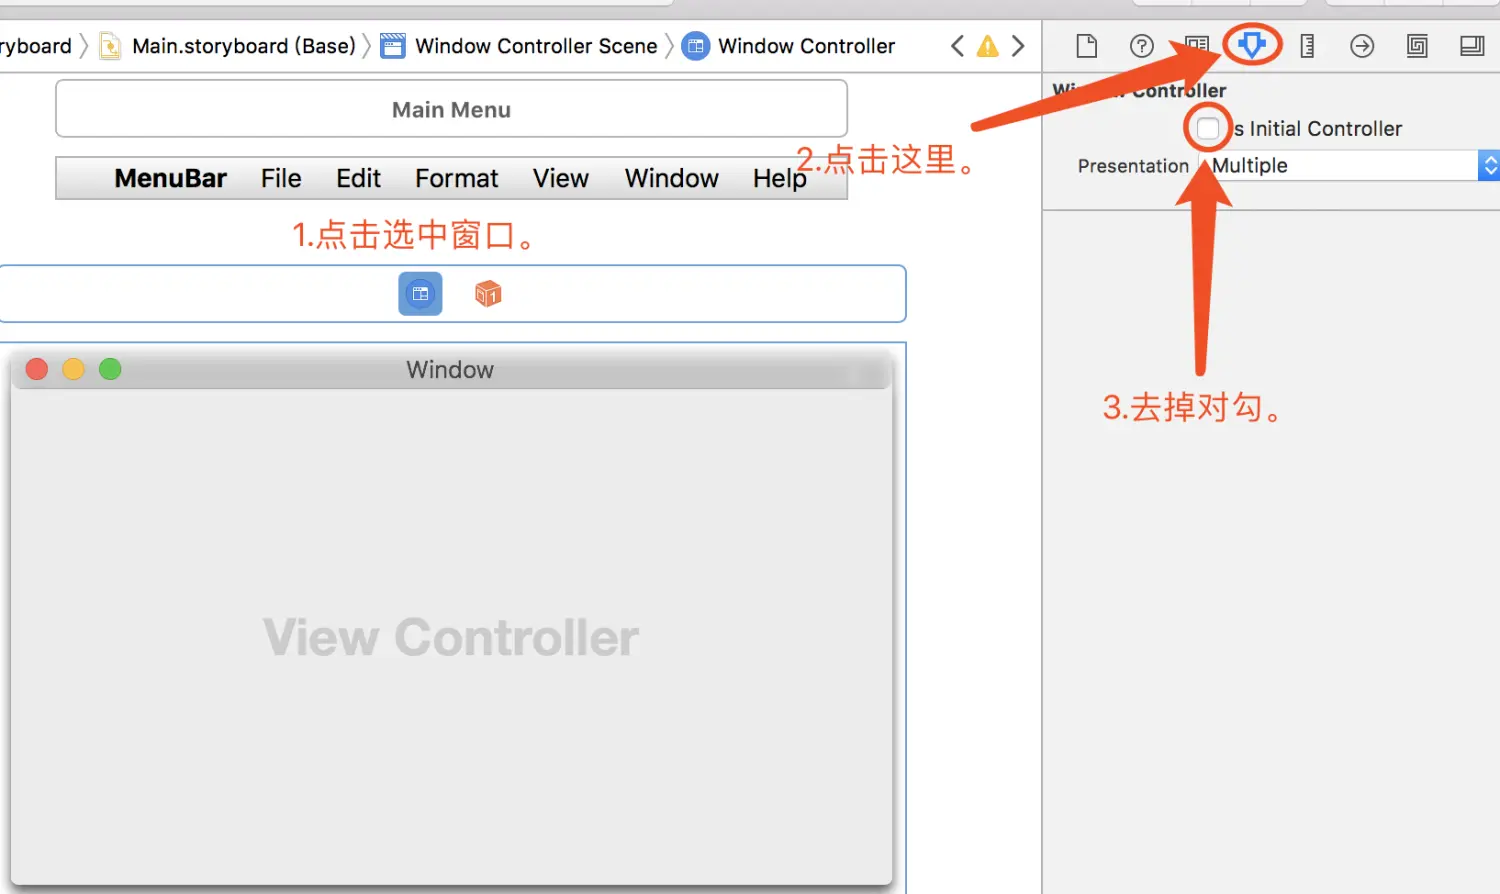
1.打开storyboard,选中窗口,取消勾选【Is initial Controller】便可去掉窗口。
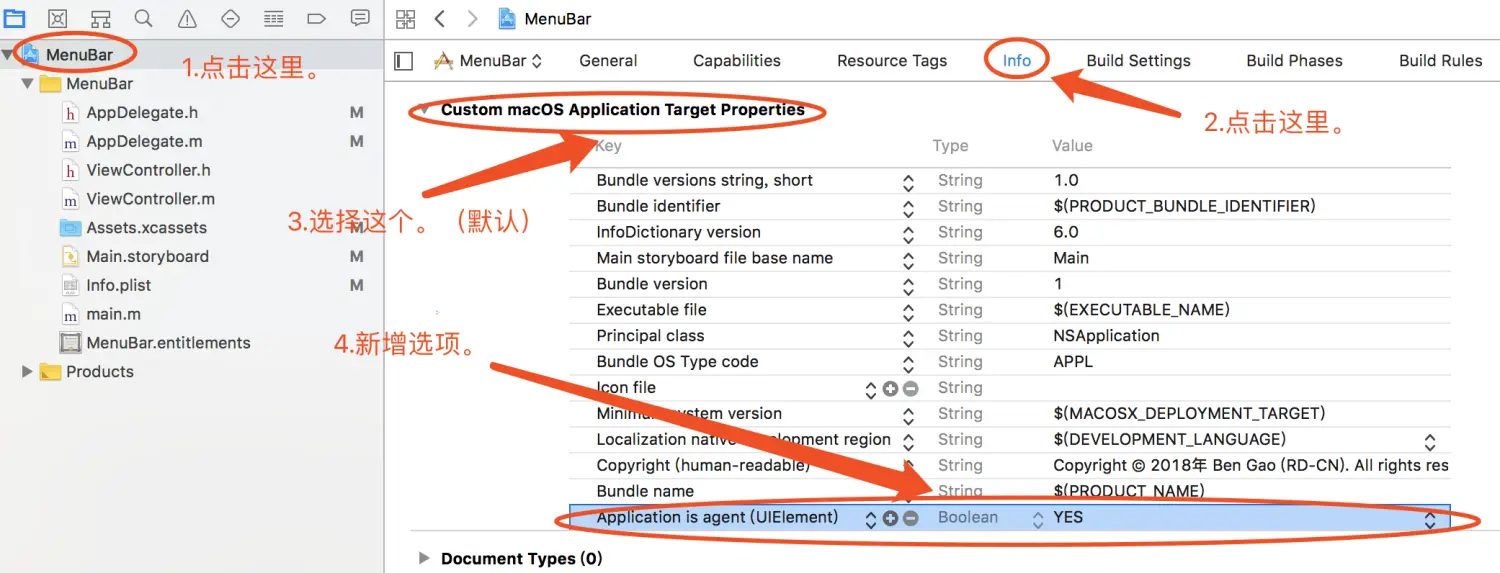
2.打开工程设置,点击【Info】,新增“Application is agent (UIElement)”选项,其值为YES。
3.阶段二完成!
#阶段三
1.注释掉AppDelegate.m中applicationDidFinishLaunching函数内部的如下语句
1
| //button.action = @selector(getDiamond:);
|
2.在applicationDidFinishLaunching函数中添加如下语句。
1
2
3
4
5
6
| NSMenu *menu;
menu = [[NSMenu alloc] init];
[menu addItem:[[NSMenuItem alloc] initWithTitle:@"Get Diamond" action:@selector(getDiamond:) keyEquivalent:@"g"] ];
[menu addItem:[NSMenuItem separatorItem]];
[menu addItem:[[NSMenuItem alloc] initWithTitle:@"Quit" action:@selector(terminate:) keyEquivalent:@"q"] ];
_statusItem.menu = menu;
|
3.AppDelegate.m修改后的完整版代码如下。
1
2
3
4
5
6
7
8
9
10
11
12
13
14
15
16
17
18
19
20
21
22
23
24
25
26
27
28
29
30
31
32
33
34
35
36
| #import "AppDelegate.h"
@interface AppDelegate ()
@property NSStatusItem *statusItem;
- (void) getDiamond:(NSStatusBarButton *)sender;
@end
@implementation AppDelegate
- (void)applicationDidFinishLaunching:(NSNotification *)aNotification {
// Insert code here to initialize your application
//初始化_statusItem
_statusItem = [[NSStatusBar systemStatusBar] statusItemWithLength:NSVariableStatusItemLength];
//设置_statusItem按钮相关信息
NSStatusBarButton *button = _statusItem.button;
if(button){
button.image = [NSImage imageNamed:@"zuan"];
//button.action = @selector(getDiamond:);
}
NSMenu *menu;
menu = [[NSMenu alloc] init];
[menu addItem:[[NSMenuItem alloc] initWithTitle:@"Get Diamond" action:@selector(getDiamond:) keyEquivalent:@"g"] ];
[menu addItem:[NSMenuItem separatorItem]];
[menu addItem:[[NSMenuItem alloc] initWithTitle:@"Quit" action:@selector(terminate:) keyEquivalent:@"q"] ];
_statusItem.menu = menu;
}
- (void) getDiamond:(NSStatusBarButton *)sender {
NSLog(@"You get a lot of diamonds!");
}
- (void)applicationWillTerminate:(NSNotification *)aNotification {
// Insert code here to tear down your application
}
@end
|
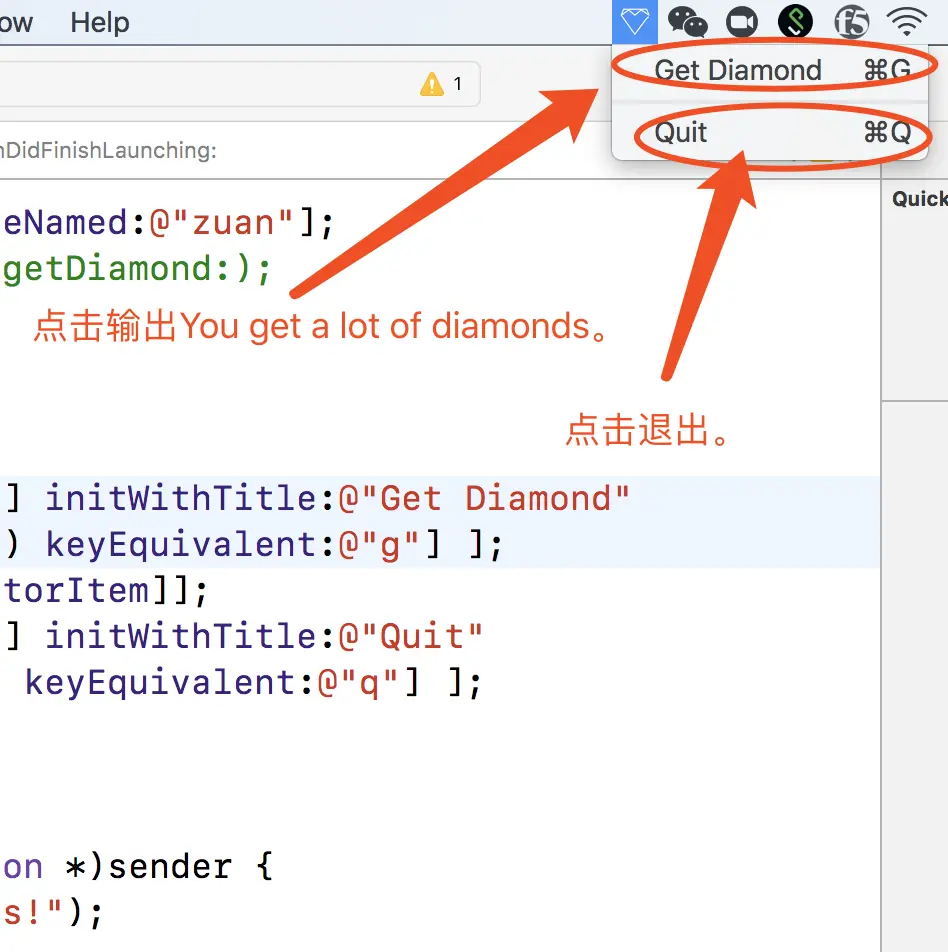
4.阶段三完成,效果如下。
#阶段四
1.添加一个ViewController的子类GetDiamonds,创建xib文件,声明并完成其初始化方法。
1
2
3
4
5
| //DiamondViewController.h
#import <Cocoa/Cocoa.h>
@interface DiamondViewController : NSViewController
- (id) initWithCustom;
@end
|
1
2
3
4
5
| //DiamondViewController.m
- (id) initWithCustom{
self = [super initWithNibName:@"DiamondViewController" bundle:nil];
return self;
}
|
2.点击DiamondViewController.xib文件,选择label拖拽直View中央。
3.打开AppDelegate.m,新增一个NSPopver的指针变量,新增部分代码,完成后代码如下。
1
2
3
4
5
6
7
8
9
10
11
12
13
14
15
16
17
18
19
20
21
22
23
24
25
26
27
28
29
30
31
32
33
34
35
36
37
38
39
40
41
42
43
44
45
46
47
48
49
50
51
52
53
54
55
56
57
58
59
| #import "AppDelegate.h"
#import "DiamondViewController.h"
@interface AppDelegate ()
@property NSStatusItem *statusItem;
@property NSPopover *popover;
- (void) getDiamond:(NSStatusBarButton *)sender;
- (void)toggleWeather:(NSStatusBarButton *)sender
@end
@implementation AppDelegate
- (void)applicationDidFinishLaunching:(NSNotification *)aNotification {
// Insert code here to initialize your application
//初始化_statusItem
_statusItem = [[NSStatusBar systemStatusBar] statusItemWithLength:NSVariableStatusItemLength];
//设置_statusItem按钮相关信息
NSStatusBarButton *button = _statusItem.button;
if(button){
button.image = [NSImage imageNamed:@"zuan"];
//修改
button.action = @selector(toggleDiamond:);
}
// 将menu注释掉。
// NSMenu *menu;
// menu = [[NSMenu alloc] init];
// [menu addItem:[[NSMenuItem alloc] initWithTitle:@"Get Diamond" action:@selector(getDiamond:) keyEquivalent:@"g"] ];
// [menu addItem:[NSMenuItem separatorItem]];
// [menu addItem:[[NSMenuItem alloc] initWithTitle:@"Quit" action:@selector(terminate:) keyEquivalent:@"q"] ];
// _statusItem.menu = menu;
//新增
_popover = [[NSPopover alloc] init];
_popover.contentViewController = [[DiamondViewController alloc] initWithCustom];
}
- (void) getDiamond:(NSStatusBarButton *)sender {
NSLog(@"You get a lot of diamonds!");
}
//新增
- (void)toggleDiamond:(NSStatusBarButton *)sender{
if([_popover isShown]){
[_popover performClose:sender];
}else{
NSStatusBarButton *button = _statusItem.button;
if(button){
[_popover showRelativeToRect:button.bounds ofView:button preferredEdge:NSRectEdgeMinY];
}
}
}
- (void)applicationWillTerminate:(NSNotification *)aNotification {
// Insert code here to tear down your application
}
@end
|
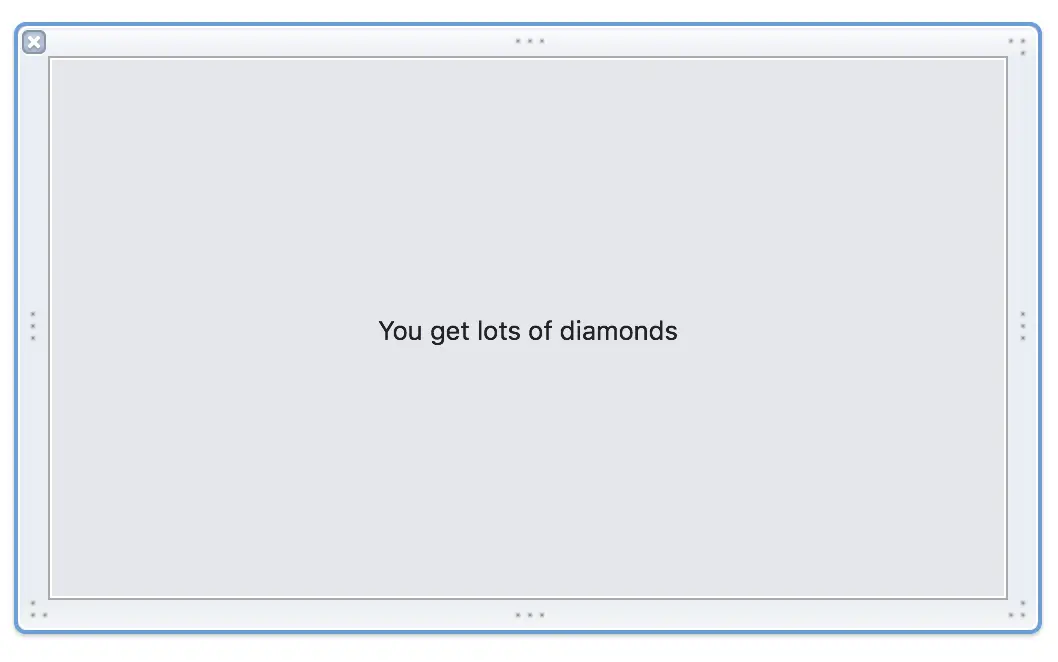
4.阶段四完成,效果如下。
#阶段五
1.新建NSObject的子类EventMonitor,代码如下。
1
2
3
4
5
6
7
8
9
10
| //EventMonitor.h
import <Cocoa/Cocoa.h>
@interface EventMonitor : NSObject
@property id monitor;
@property NSEventMask mask;
@property void (^handler)(NSEvent *);
- (id) initWithMaskAndHandler:(NSEventMask)mask handler:(void (^)(NSEvent *))handler;
- (void) start;
- (void) stop;
@end
|
1
2
3
4
5
6
7
8
9
10
11
12
13
14
15
16
17
18
19
20
21
22
23
| //EventMonitor.m
#import "EventMonitor.h"
@implementation EventMonitor
- (id) initWithMaskAndHandler:(NSEventMask)mask handler:(void (^)(NSEvent *)) handler {
self = [super init];
if(self){
_mask = mask;
_handler = handler;
}
return self;
}
- (void) start{
_monitor = [NSEvent addGlobalMonitorForEventsMatchingMask:_mask handler:_handler];
}
- (void) stop{
if(_monitor != nil ){
[NSEvent removeMonitor:_monitor];
_monitor = nil;
}
}
@end
|
3.打开AppDelegate.m,添加EventMonitor的成员变量,并对其进行初始化。
1
2
3
4
5
6
| @property EventMonitor* eventMonitor;
_eventMonitor = [[EventMonitor alloc] initWithMaskAndHandler:NSEventMaskLeftMouseUp|NSEventMaskRightMouseUp handler:^(NSEvent *h) {
if([_popover isShown]){
[self closePopover:h];
}
}];
|
4.对代码进行修改,新增closePopover和showPopover函数,修改toggleDiamond函数部分代码。
1
2
3
4
5
6
7
8
9
10
11
12
13
14
15
16
17
18
19
20
21
22
23
24
25
| //新增
-(void) closePopover:(id)sender{
[_popover performClose:sender];
[_eventMonitor stop];
}
//新增
-(void) showPopover:(id)sender{
NSStatusBarButton *button = [_statusItem button];
if(button){
[_popover showRelativeToRect:button.bounds ofView:button preferredEdge:NSRectEdgeMinY];
}
[_eventMonitor start];
}
-(void) toggleDiamond:(NSStatusBarButton *)sender{
if([_popover isShown]){
//修改
[self closePopover:sender];
}else{
//修改
[self showPopover:sender];
}
}
|
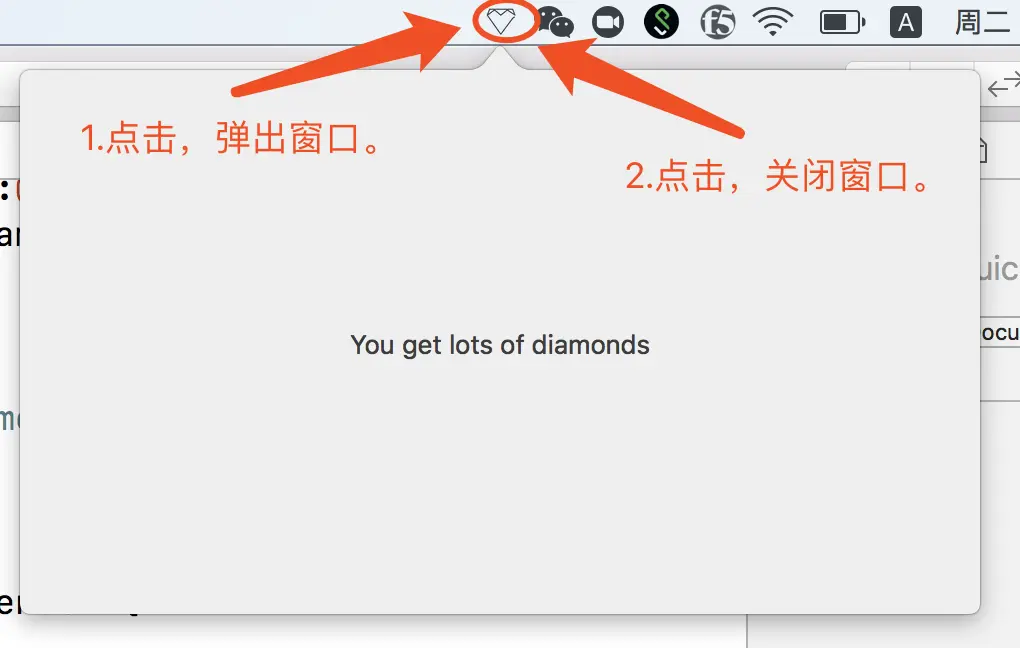
5.阶段五完成,效果如下。

#结语
想了解更多关于Popover的用法,详见:一步一步熟悉Mac app开发(九)之NSPopover