#概要
阶段一,完成数据的显示。
阶段二,完成数据拖拽的调整。(存在未知问题)
阶段三,实现撤销功能。(存在问题)
#阶段一 实现数据的显示
1.新建项目,打开storyboard,将source list拖拽直默认的view controller中。
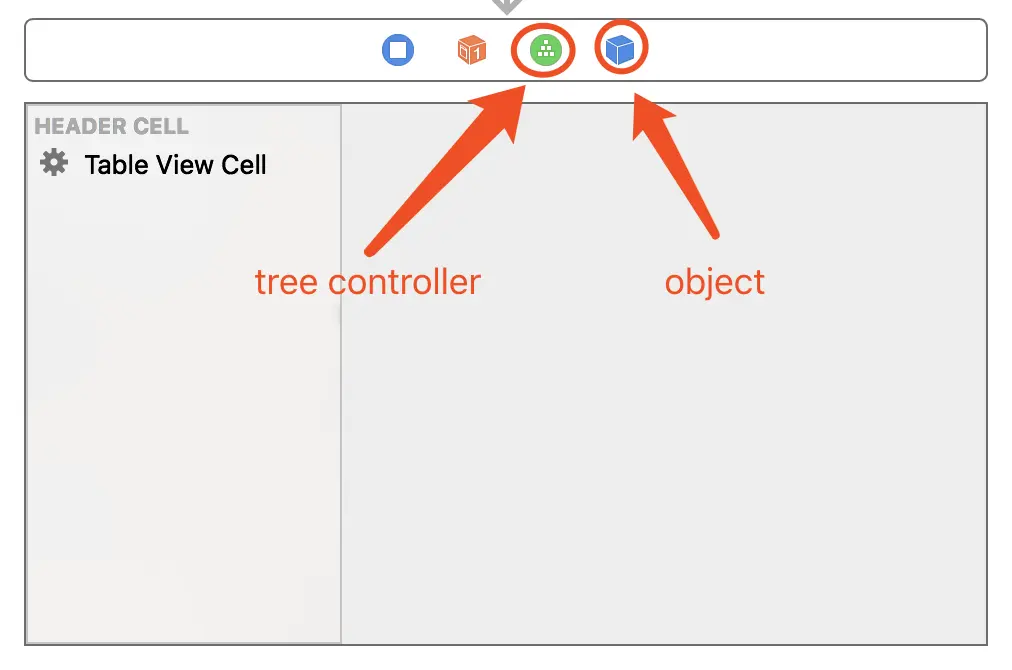
2.将tree controller和object拖拽至默认的view controller的顶部。(不会的请看前文)
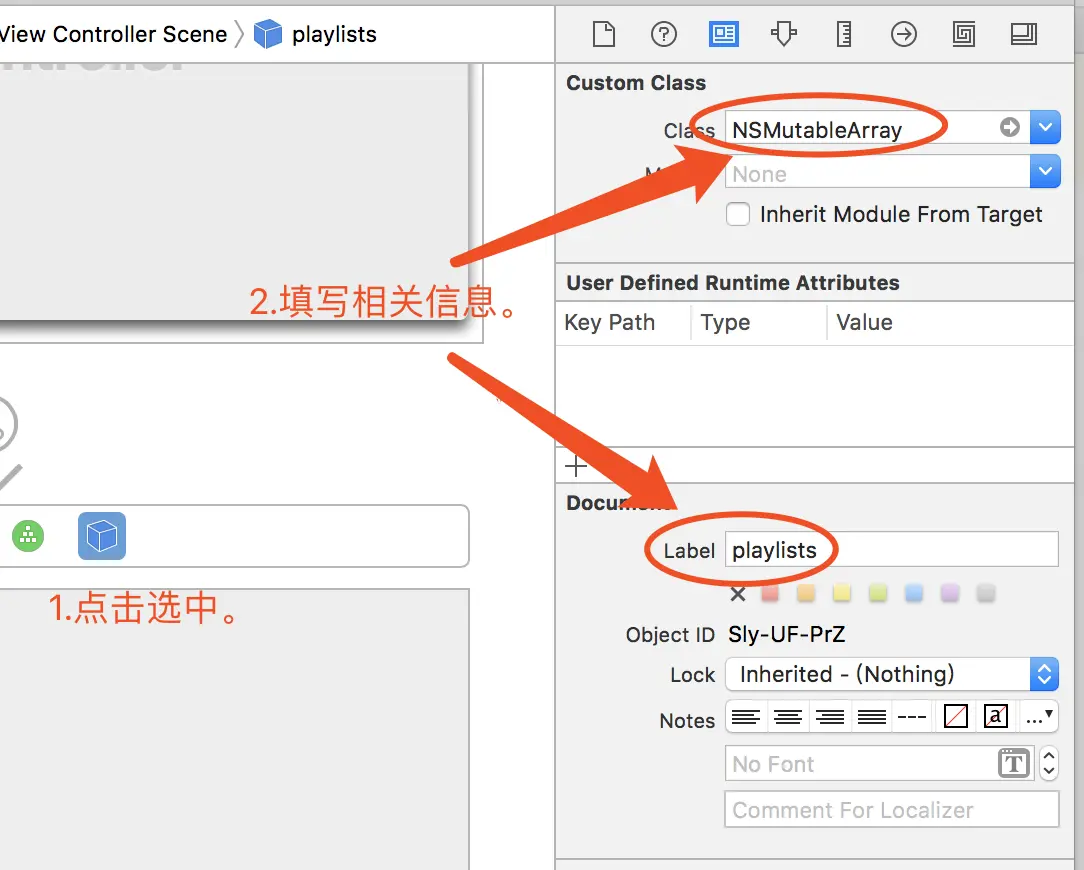
3.点击选中object,设置其【Custom Class】为“NSMutableArray”,设置其【Document Label】为playlits。
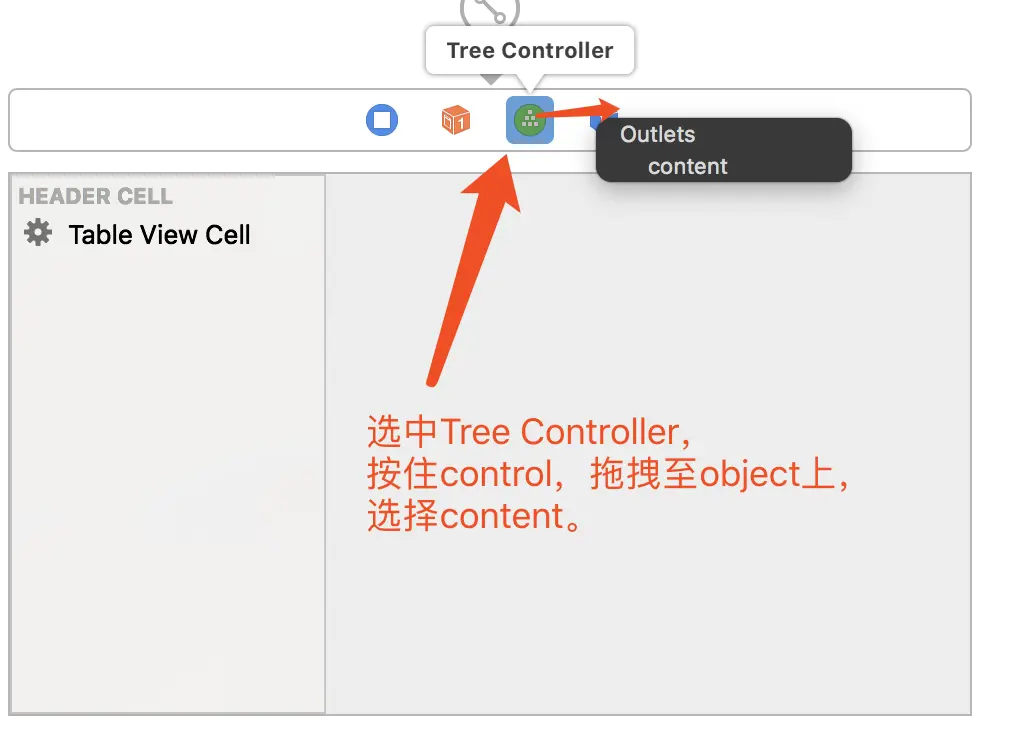
4.点击选中Tree Controller,按住Control键将其拖拽至object图标上,选择content。
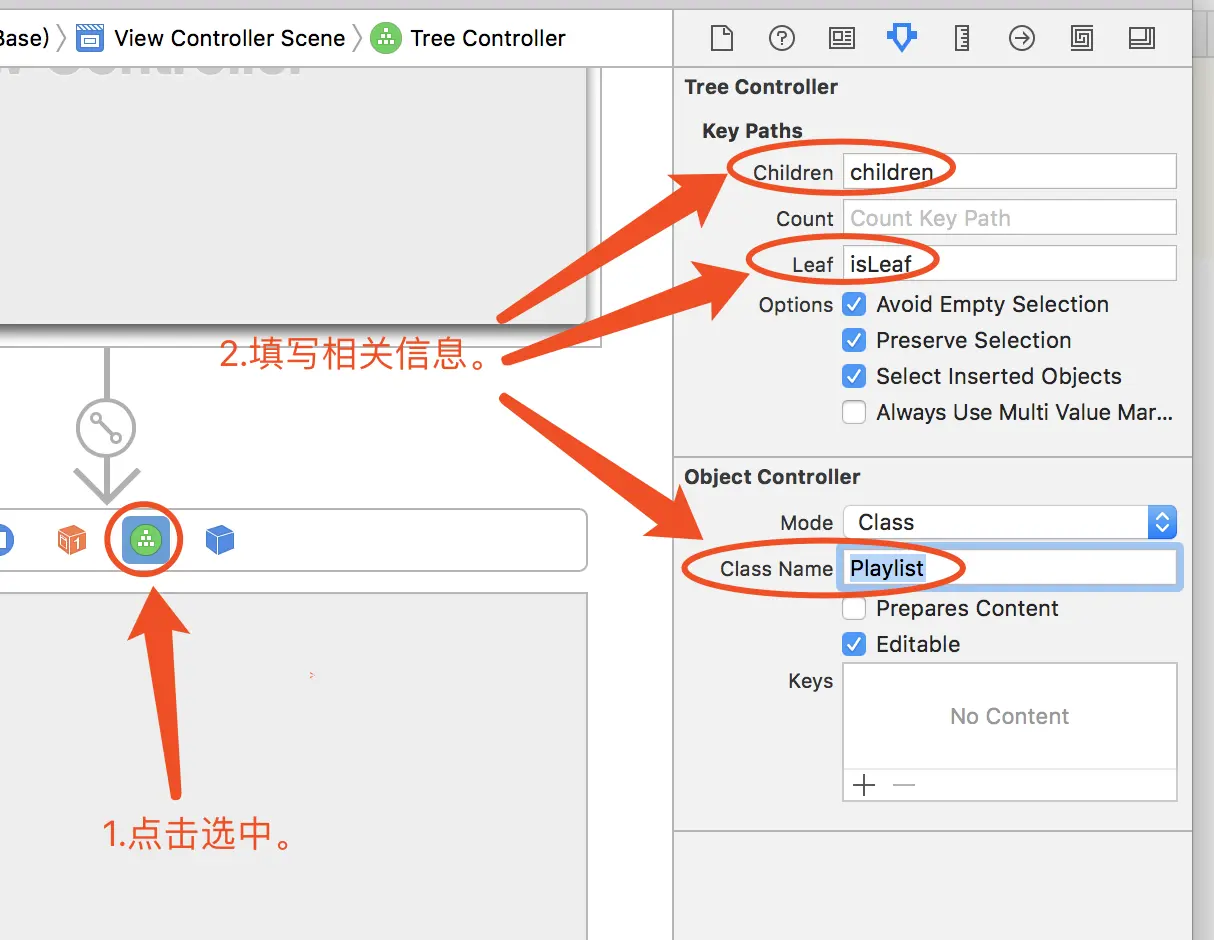
5.点击选中Tree Controller,设置其Children为children、Ledf为isLeaf、Class Name为Playlist。(聪明的你知道我们下一步要做什么了吗?)
6.新建一个NSObject的子类Playlist,声明两个属性name和creator,声明并实现isLeaf和初始化方法。
1
2
3
4
5
6
7
8
9
| //Playlist.h
#import <Cocoa/Cocoa.h>
@interface Playlist : NSObject
@property NSString *name;
@property NSString *creator;
- (bool) isLeaf;
- (id) init;
- (id) initWithCustom:(NSString*)name;
@end
|
1
2
3
4
5
6
7
8
9
10
11
12
13
14
15
16
17
18
19
20
21
22
23
24
25
| #import "Playlist.h"
@implementation Playlist
-(id) init{
self = [super init];
if(self){
_name = @"New Player";
_creator = @"N/A";
}
return self;
}
-(id) initWithCustom:(NSString*)name{
self = [super init];
if(self){
_name = name;
_creator = @"N/A";
}
return self;
}
-(bool) isLeaf{
return YES;
}
@end
|
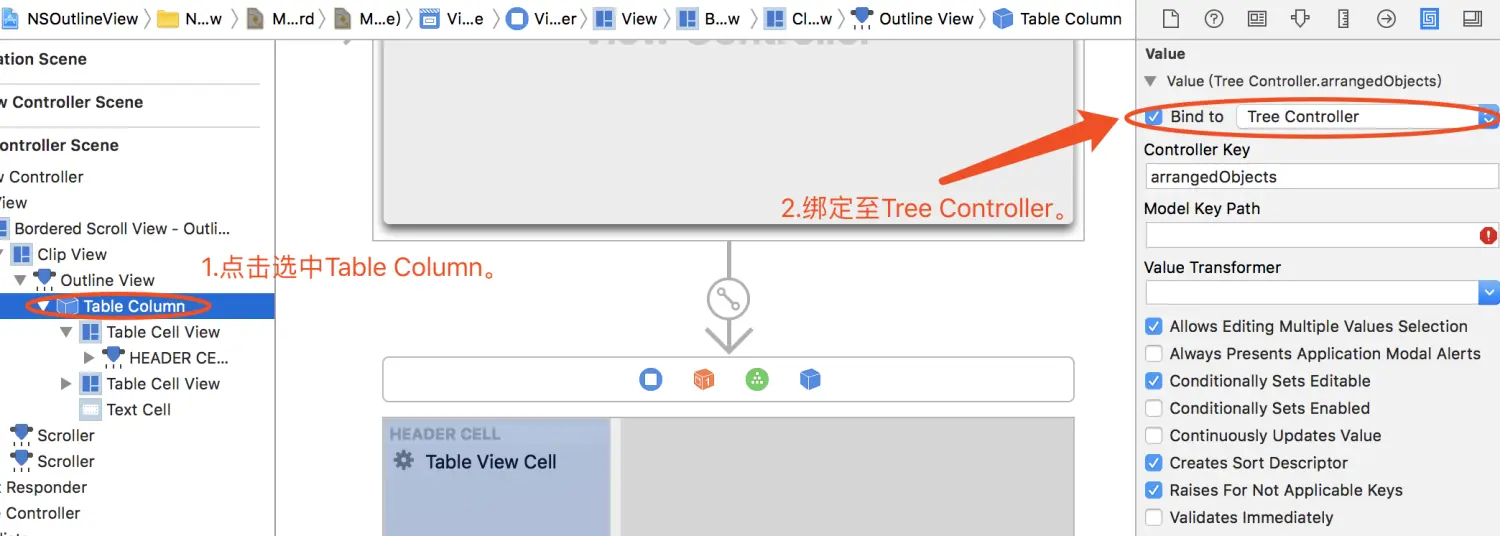
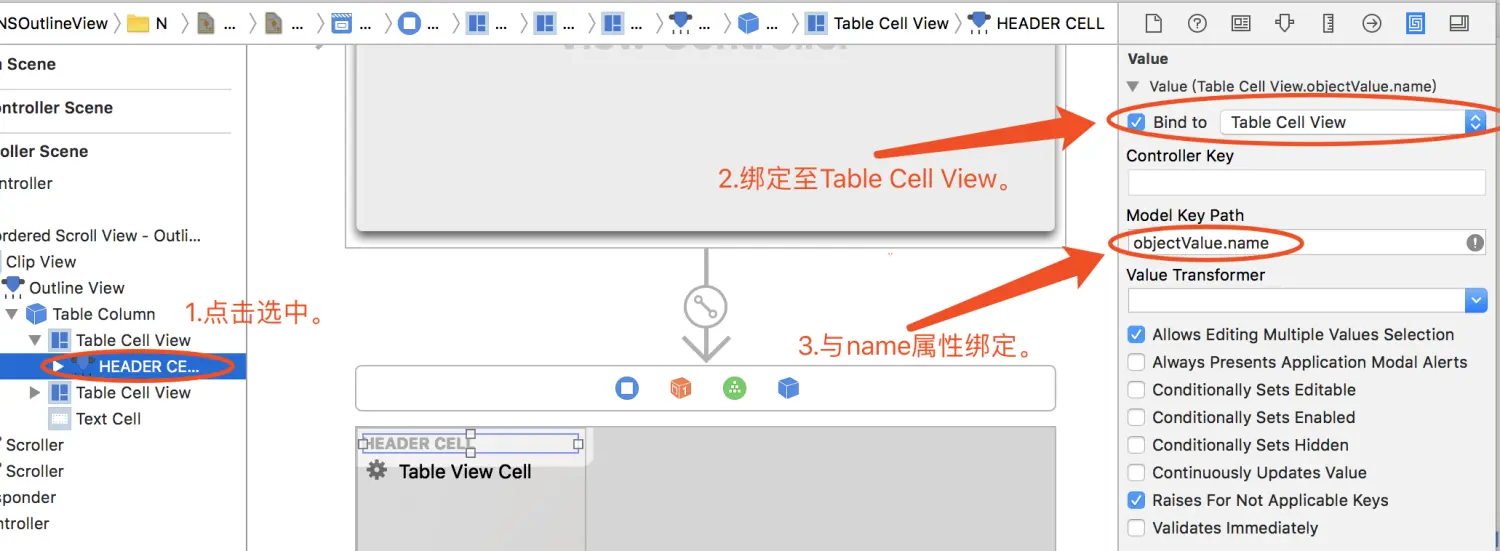
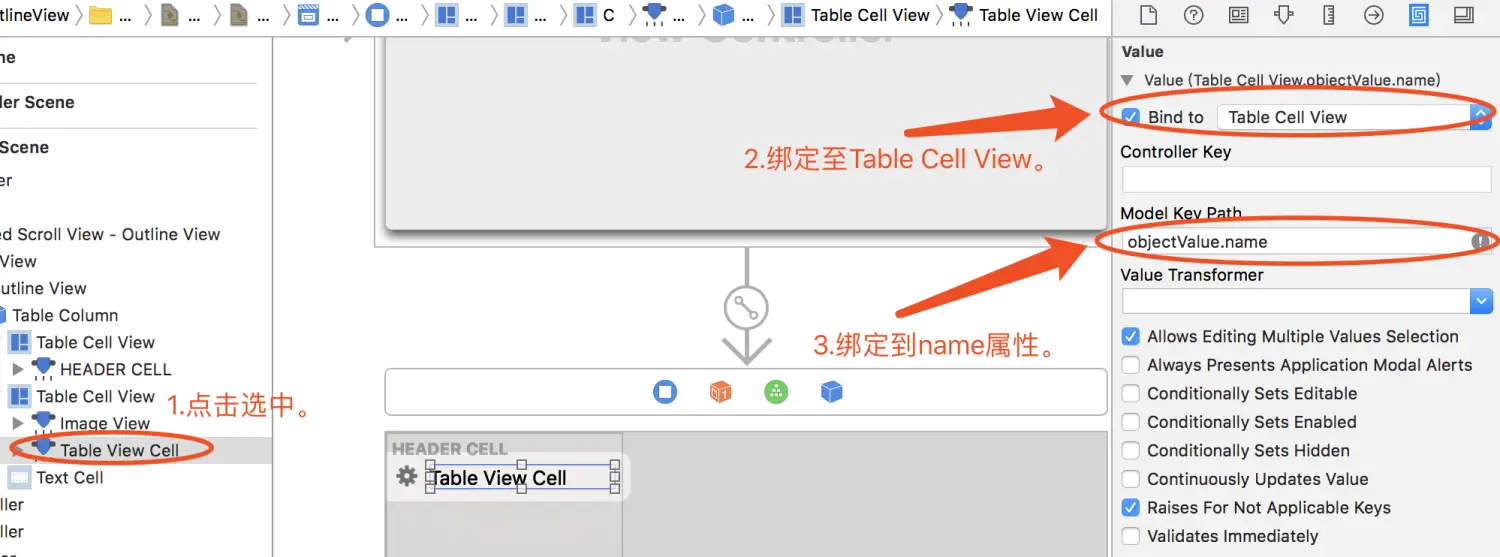
7、绑定。
7-1、将Table Column与Tree Controller进行绑定;
7-2将HEADER CELL与Table Cell View进行绑定,并设置其key path为objectvalue.name;
7-3、将Table View Cell与Table Cell View进行绑定,设置为其key path为objectvalue.name。
7-4、最后将View Controller做为Outline View的Datasource与Delegate。
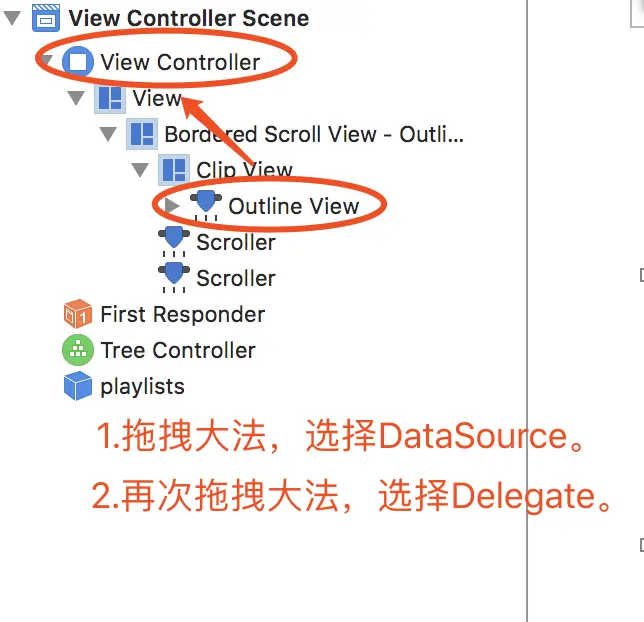
8.拖拽大法,将outline view与tree controller拖拽直ViewController.h中。
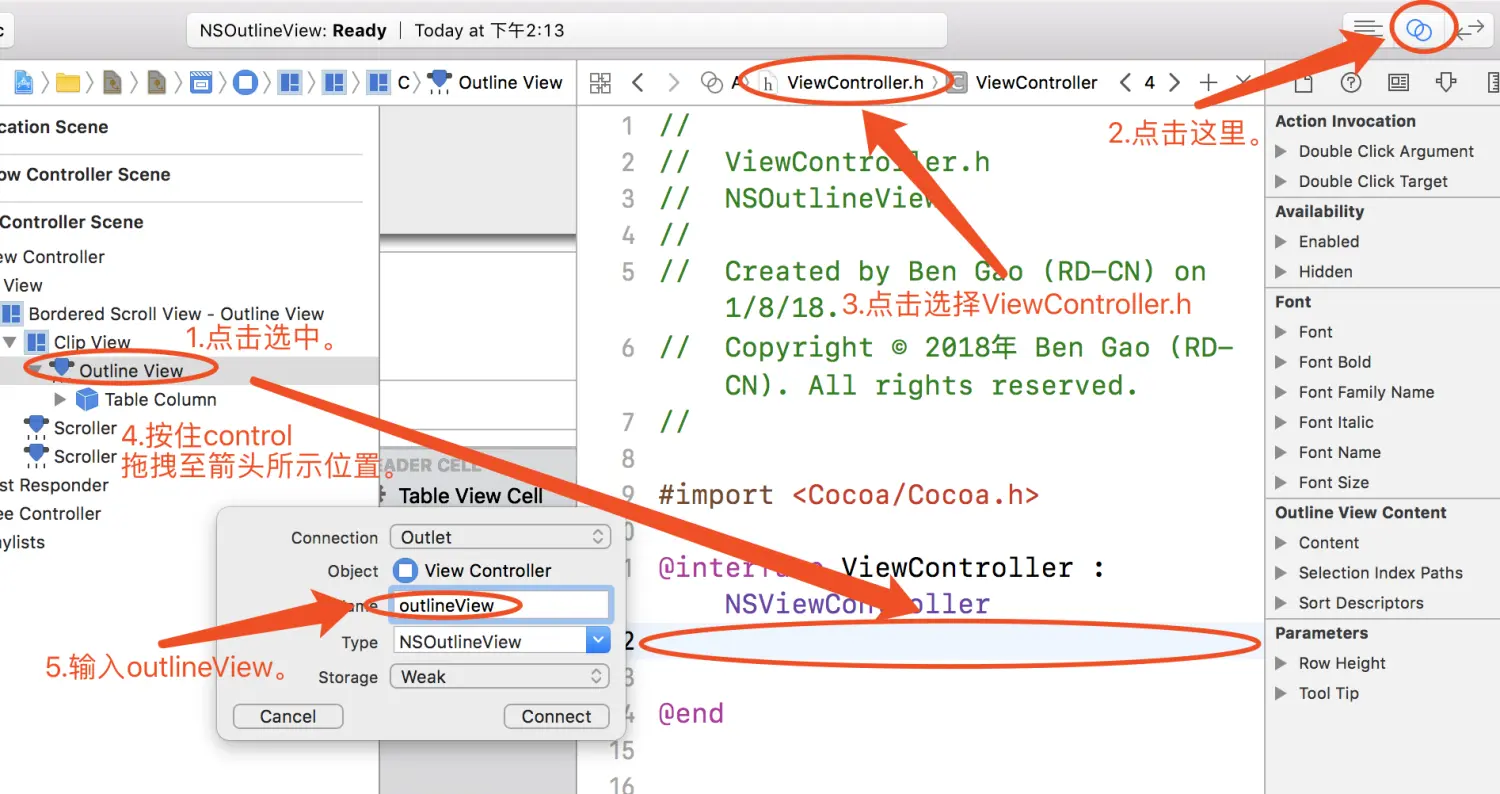
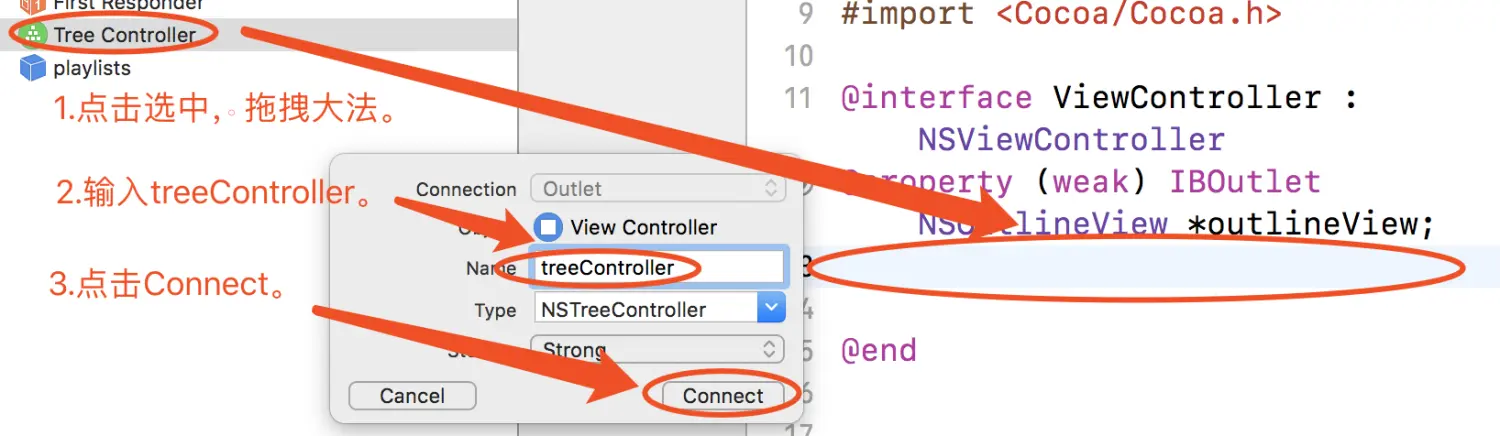
并且在ViewController.h中添加NSOutlineViewDataSource和NSOutlineViewDelegate协议。
1
2
3
4
5
6
| //ViewController.h
#import <Cocoa/Cocoa.h>
@interface ViewController : NSViewController<NSOutlineViewDataSource,NSOutlineViewDelegate>
@property (weak) IBOutlet NSOutlineView *outlineView;
@property (strong) IBOutlet NSTreeController *treeController;
@end
|
9.在ViewController.m中添加addData方法,并在viewDidLoad中调用,实现outlineView的协议方法。
1
2
3
4
5
6
7
8
9
10
11
12
13
14
15
16
17
18
19
20
21
22
23
24
25
26
27
28
29
30
31
32
33
34
35
36
37
38
39
40
41
42
43
44
45
46
47
48
49
50
| #import "ViewController.h"
#import "Playlist.h"
@implementation ViewController
- (void)viewDidLoad {
[super viewDidLoad];
// Do any additional setup after loading the view.
[self addData];
}
//内部方法1:初始化数据
- (void) addData{
NSDictionary *root = @{@"name":@"Library",@"isLeaf":@NO};
NSMutableArray *array =[[NSMutableArray alloc] initWithCapacity:(NSUInteger)10];
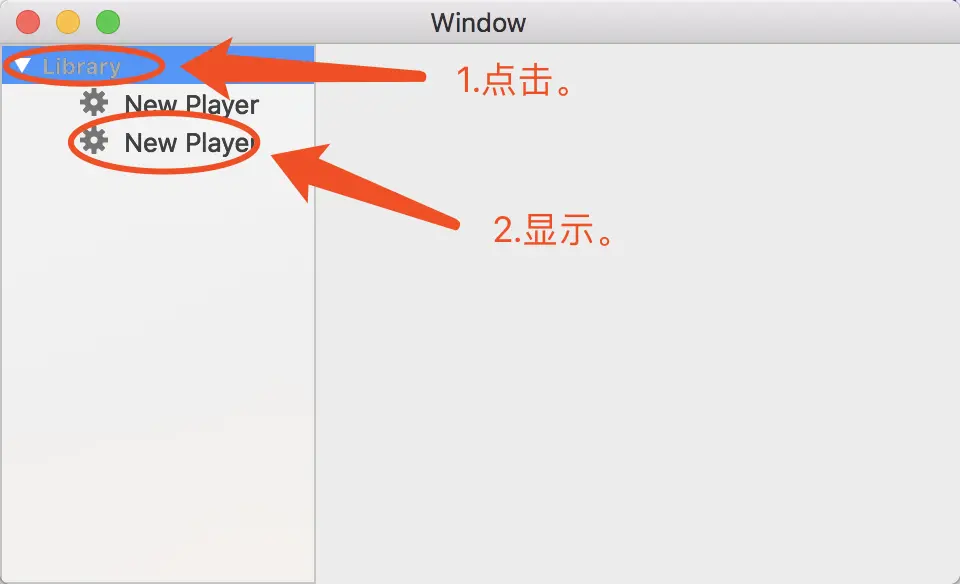
[array addObject:[[Playlist alloc] initWithCustom:@"New Player1"]];
[array addObject:[[Playlist alloc] initWithCustom:@"New Player2"]];
NSMutableDictionary *dict = [[NSMutableDictionary alloc] initWithDictionary:root];
[dict setObject:array forKey:@"children"];
[_treeController addObject:dict];
}
//内部方法2:判断是否为头
- (bool) isHeader:(id)Item{
Item = (NSTreeNode*)Item;
if(Item){
return ![[Item representedObject] isKindOfClass:[Playlist class]];
}
return ![Item isKindOfClass:[Playlist class]];
}
//实现协议方法
- (NSView *)outlineView:(NSOutlineView *)outlineView viewForTableColumn:(NSTableColumn *)tableColumn item:(id)item{
if([self isHeader:item]){
return [outlineView makeViewWithIdentifier:@"HeaderCell" owner:self];
}
return [outlineView makeViewWithIdentifier:@"DataCell" owner:self];
}
- (void)setRepresentedObject:(id)representedObject {
[super setRepresentedObject:representedObject];
// Update the view, if already loaded.
}
@end
|
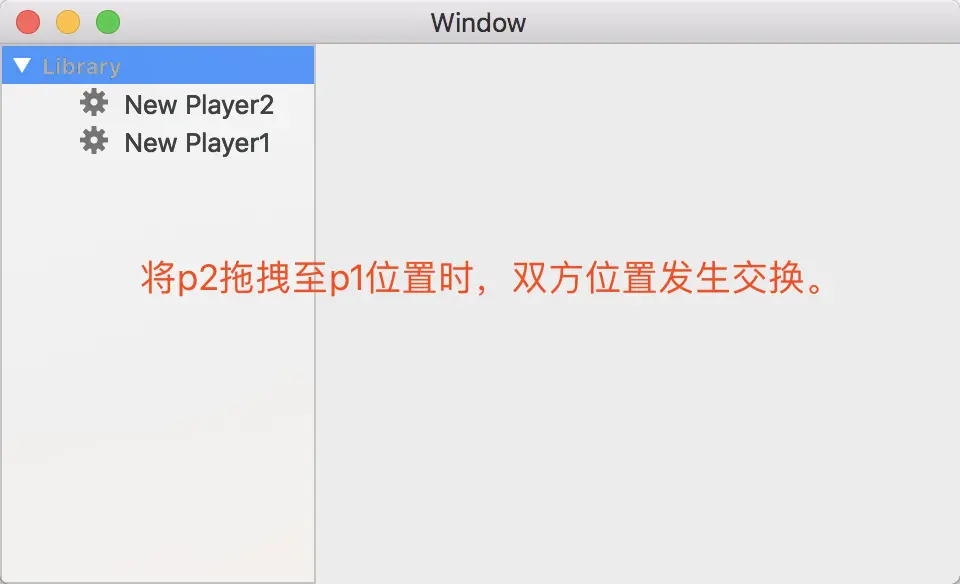
10.阶段一完成,效果如下。
#阶段二 实现拖拽调整数据功能
1.打开ViewController.m中,在viewDidLoad方法中新增代码。
1
2
3
4
5
6
| //阶段二
[_outlineView expandItem:nil expandChildren:YES]; //自动展开
//拖拽事件相关
NSMutableArray *arr = [[NSMutableArray alloc] init];
[arr addObject:NSPasteboardTypeString];
[_outlineView registerForDraggedTypes:arr];
|
2.添加以下三个函数。
1
2
3
4
5
6
7
8
9
10
11
12
13
14
15
16
17
18
19
20
21
22
23
24
25
26
27
28
29
30
31
32
33
34
35
36
37
38
39
40
41
42
43
44
45
46
47
| //阶段二之支持拖拽
- (id<NSPasteboardWriting>)outlineView:(NSOutlineView *)outlineView pasteboardWriterForItem:(id)item{
Playlist *playlist = [item representedObject];
if ([playlist isKindOfClass:[Playlist class]]){
NSPasteboardItem* pbItem = [[NSPasteboardItem alloc] init];
[pbItem setString:playlist.name forType:NSPasteboardTypeString];
return pbItem;
}
return nil;
}
//阶段二之判断是否为有效拖拽
- (NSDragOperation)outlineView:(NSOutlineView *)outlineView validateDrop:(id<NSDraggingInfo>)info proposedItem:(id)item proposedChildIndex:(NSInteger)index{
bool canDrag = index>=0 && item!=nil;
if (!canDrag){
return NSDragOperationNone;
}
return NSDragOperationMove;
}
//阶段二之拖拽调整位置
- (BOOL)outlineView:(NSOutlineView *)outlineView acceptDrop:(id<NSDraggingInfo>)info item:(id)item childIndex:(NSInteger)index{
NSPasteboard* pb = [info draggingPasteboard];
NSString *name = [pb stringForType:NSPasteboardTypeString];
NSTreeNode *sourceNode = nil;
if([(NSTreeNode*)item childNodes] != nil){
for(id node in [item childNodes]){
Playlist * playlist = [node representedObject];
if([playlist isKindOfClass:[Playlist class]]){
if([playlist.name isEqualToString:name]){
sourceNode = node;
}
}
}
}
if(sourceNode == nil){
return NO;
}
NSUInteger indexs[] ={0,index};
NSIndexPath* toIndexPath = [[NSIndexPath alloc] initWithIndexes:indexs length:2];
[_treeController moveNode:sourceNode toIndexPath:toIndexPath];
return YES;
}
|
3.阶段二,完成!
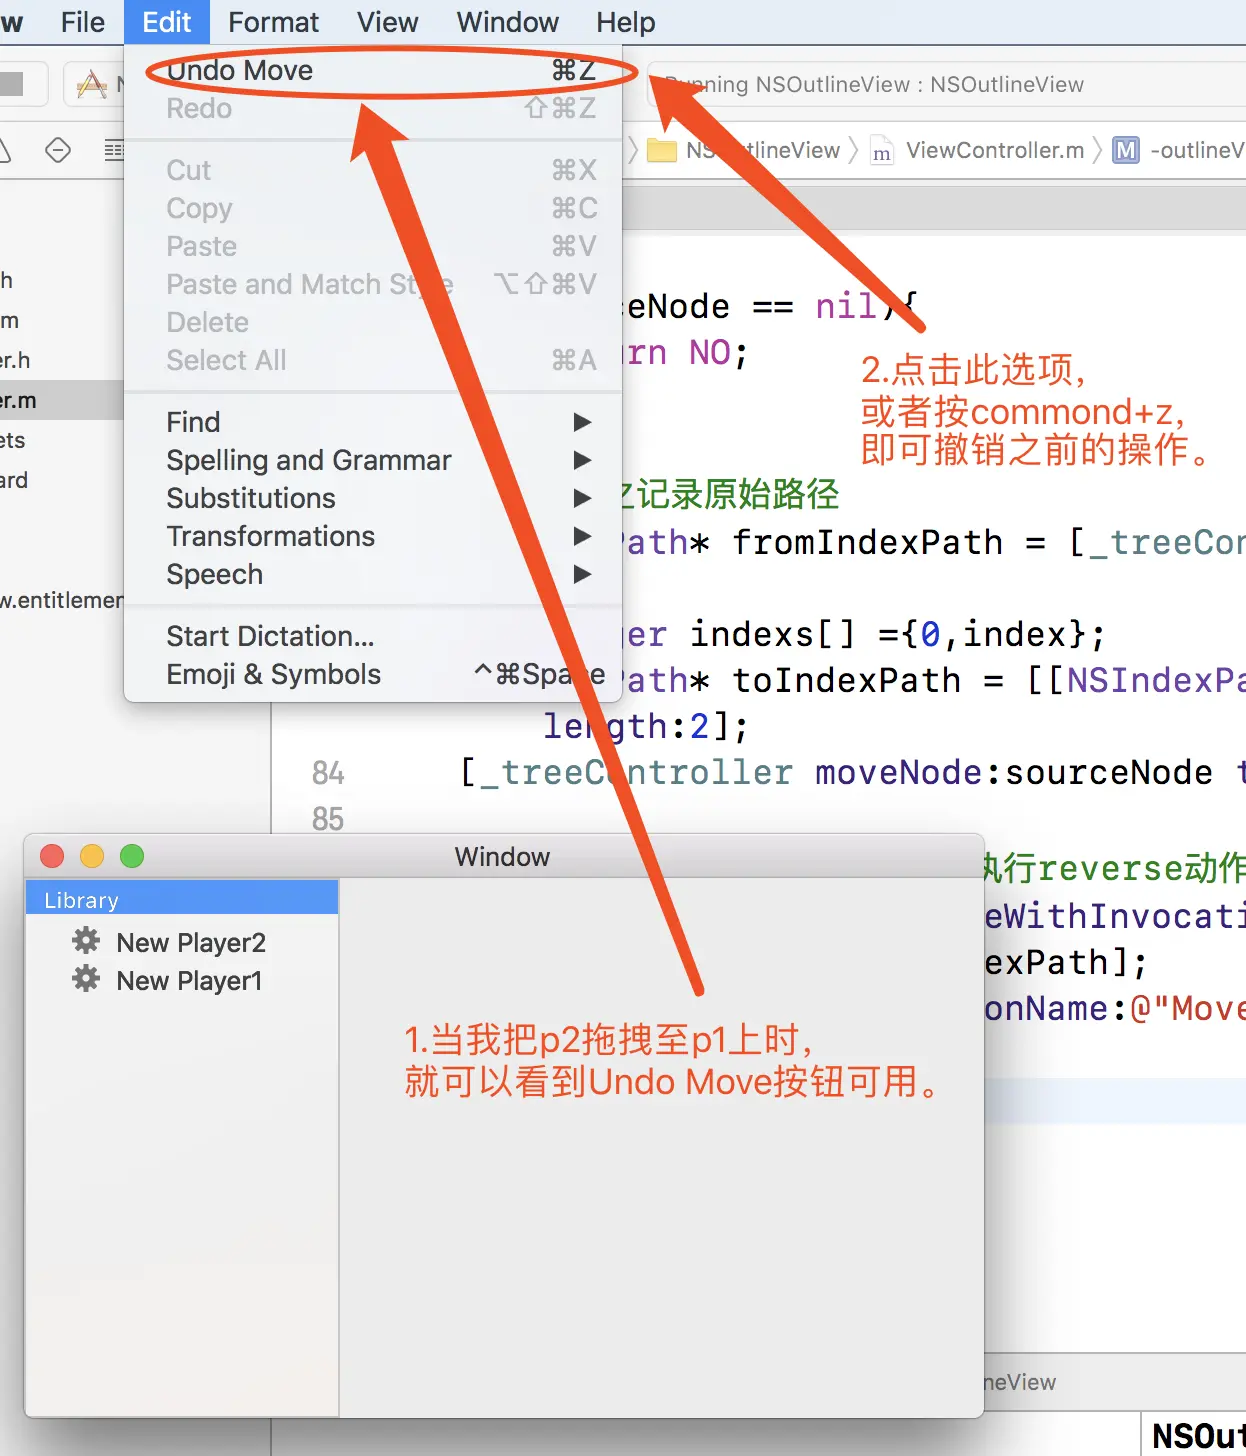
#阶段三 实现撤销功能
1.实现两个协议方法。
1
2
3
4
5
6
7
8
9
| //阶段三之是否为GroupItem
- (BOOL)outlineView:(NSOutlineView *)outlineView isGroupItem:(id)item{
return [self isHeader:item];
}
//阶段三之执行撤销动作
- (void)reverse:(NSTreeNode*)sourceNode fromIndexPath:(NSIndexPath*)fromIndexPath{
[_treeController moveNode:sourceNode toIndexPath:fromIndexPath];
}
|
2.添加部分代码至outlineView(acceptDrop)函数中。
1
2
3
4
5
6
7
8
9
10
11
12
13
14
15
16
17
18
19
20
21
22
23
24
25
26
27
28
29
30
31
32
33
34
| //阶段二之拖拽调整位置
- (BOOL)outlineView:(NSOutlineView *)outlineView acceptDrop:(id<NSDraggingInfo>)info item:(id)item childIndex:(NSInteger)index{
NSPasteboard* pb = [info draggingPasteboard];
NSString *name = [pb stringForType:NSPasteboardTypeString];
NSTreeNode *sourceNode = nil;
if([(NSTreeNode*)item childNodes] != nil){
for(id node in [item childNodes]){
Playlist * playlist = [node representedObject];
if([playlist isKindOfClass:[Playlist class]]){
if([playlist.name isEqualToString:name]){
sourceNode = node;
}
}
}
}
if(sourceNode == nil){
return NO;
}
//阶段三之记录原始路径
NSIndexPath* fromIndexPath = [_treeController selectionIndexPath];
NSUInteger indexs[] ={0,index};
NSIndexPath* toIndexPath = [[NSIndexPath alloc] initWithIndexes:indexs length:2];
[_treeController moveNode:sourceNode toIndexPath:toIndexPath];
//阶段三之配置undoManager,执行reverse动作。
[[self.undoManager prepareWithInvocationTarget:self] reverse:sourceNode fromIndexPath:fromIndexPath];
[self.undoManager setActionName:@"Move"];
return YES;
}
|
3.阶段三完成,效果如下。
#思考
这里有个小问题,在拖拽p2时,必须先点击选中p2,再去将p2拖拽至p1,否则在撤销时,就会存在p2与Library位置互换的BUG。
这个可爱的BUG就交给你们去修复啦!