一、结构
NSRect是一个用来表示矩形的结构体,在苹果官方文档中其声明如下:
从上述声明来看,NSRect与CGRect是同一个类型,其定义汇总如下:
1
2
3
4
5
6
7
8
9
10
11
12
13
14
15
16
17
18
19
| struct CGRect {
CGPoint origin; //起点坐标(x,y)
CGSize size; //大小 width*height
};
typedef struct CGRect CGRect;
//坐标点
struct CGPoint {
CGFloat x;
CGFloat y;
};
typedef struct CGPoint CGPoint;
//大小
struct CGSize {
CGFloat width;
CGFloat height;
};
typedef struct CGSize CGSize;
|
那么CGFloat是什么鬼呢?
在32位平台下CGFloat实际上就是float,在64位平台下CGFloat是double。
二、接口
1、创建NSRect。
1
2
3
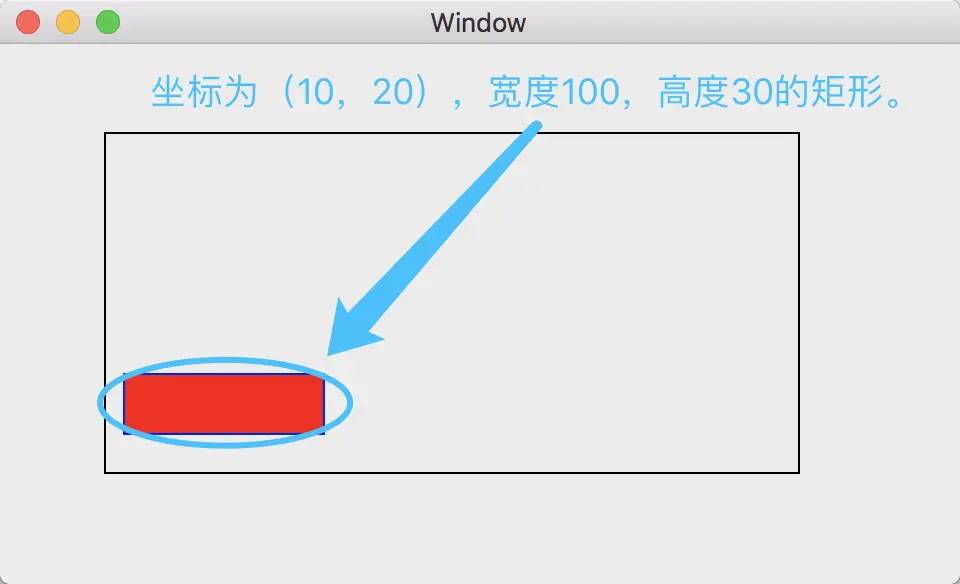
| //创建一个起点坐标(10,20),宽度100,高度30的矩形。
NSRect testRect1 = NSMakeRect(10, 20, 100, 30);
CGRect testRect2 = CGRectMake(10, 20, 100, 30);
|
2、获取相关属性。
1
2
3
4
5
6
7
8
9
10
11
12
13
14
15
16
17
18
19
20
| //NS系列
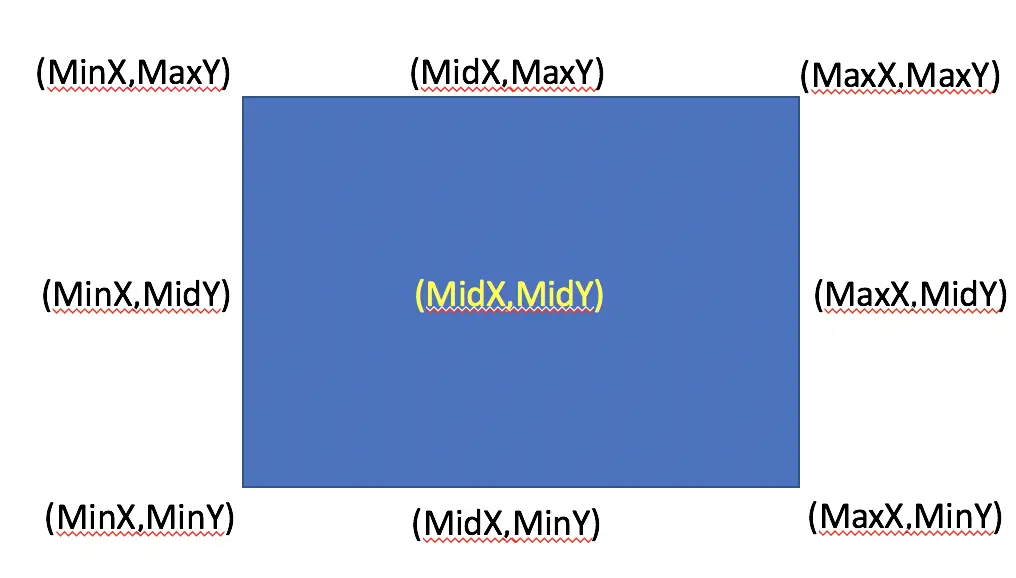
NSLog(@"MinX = %lf",NSMinX(testRect1)); //10
NSLog(@"MidX = %lf",NSMidX(testRect1)); //10+100/2
NSLog(@"MaxX = %lf",NSMaxX(testRect1)); //10+100
NSLog(@"MinY = %lf",NSMinY(testRect1)); //20
NSLog(@"MidY = %lf",NSMidY(testRect1)); //20+30/2
NSLog(@"MaxY = %lf",NSMaxY(testRect1)); //20+30
//CG系列
NSLog(@"MinX = %lf",CGRectGetMinX(testRect2));
NSLog(@"MidX = %lf",CGRectGetMidX(testRect2));
NSLog(@"MaxX = %lf",CGRectGetMaxX(testRect2));
NSLog(@"MinY = %lf",CGRectGetMinY(testRect2));
NSLog(@"MidY = %lf",CGRectGetMidY(testRect2));
NSLog(@"MaxY = %lf",CGRectGetMaxY(testRect2));
//矩形的中心坐标
NSPoint mid = NSMakePoint(NSMidX(testRect1),NSMidY(testRect1));
|
3、NSRect与CGRect的相互转换。
既然前文说过了NSRect与CGRect是同一个东西,讲道理在使用时可以不需要进行转换。
实际上我们在项目中为了规范,为了维护的便利性,我们还是需要用两个函数来进行转换:
1
2
3
4
5
| //NSRect转换为CGRect
CGRect toCGRect = NSRectToCGRect(testRect1);
//CGRect转换为NSRect
NSRect toNSRect = NSRectFromCGRect(testRect2);
|
4、两个转换函数定义(额外)
可能有些小伙伴好奇了,既然NSRect与CGRect是同一个类型,那么转换函数是怎么做的呢?
1
2
3
4
5
6
7
8
9
10
| //去掉内联宏之后转换代码如下
NSRect NSRectFromCGRect(CGRect cgrect) {
union _ {NSRect ns; CGRect cg;};
return ((union _ *)&cgrect)->ns;
}
CGRect NSRectToCGRect(NSRect nsrect) {
union _ {NSRect ns; CGRect cg;};
return ((union _ *)&nsrect)->cg;
}
|
三、绘制矩形
1、新建项目,在storyboard中添加一个Custom View。
2、选中Custom View,设置其Custom Class为“MyView”。
3、新建文件MyView,继承于NSView类。
4、重写initWithCoder方法,代码如下:
1
2
3
4
5
6
7
8
| -(instancetype)initWithCoder:(NSCoder *)decoder{
self = [super initWithCoder:decoder];
if(self){
self.wantsLayer = YES;
self.layer.borderWidth = 1;
}
return self;
}
|
5、在drawRect方法中,代码如下:
1
2
3
4
5
6
7
8
9
10
11
12
13
14
15
| - (void)drawRect:(NSRect)dirtyRect {
[super drawRect:dirtyRect];
CAShapeLayer *myRectLayer = [CAShapeLayer layer]; //初始化一个层
CGMutablePathRef path = CGPathCreateMutable(); //初始化路径
CGRect testRect2 = CGRectMake(10, 20, 100, 30); //初始化Rect
CGPathAddRect(path, NULL, testRect2);
myRectLayer.path = path; //设置层的路径
myRectLayer.fillColor = [NSColor redColor].CGColor; //设置填充色
myRectLayer.strokeColor = [NSColor blueColor].CGColor; //设置画笔颜色
myRectLayer.lineWidth = 1; //设置画笔粗细
[self.layer addSublayer:myRectLayer]; //将矩形层添加至View中
}
|
6、运行程序,查看效果。