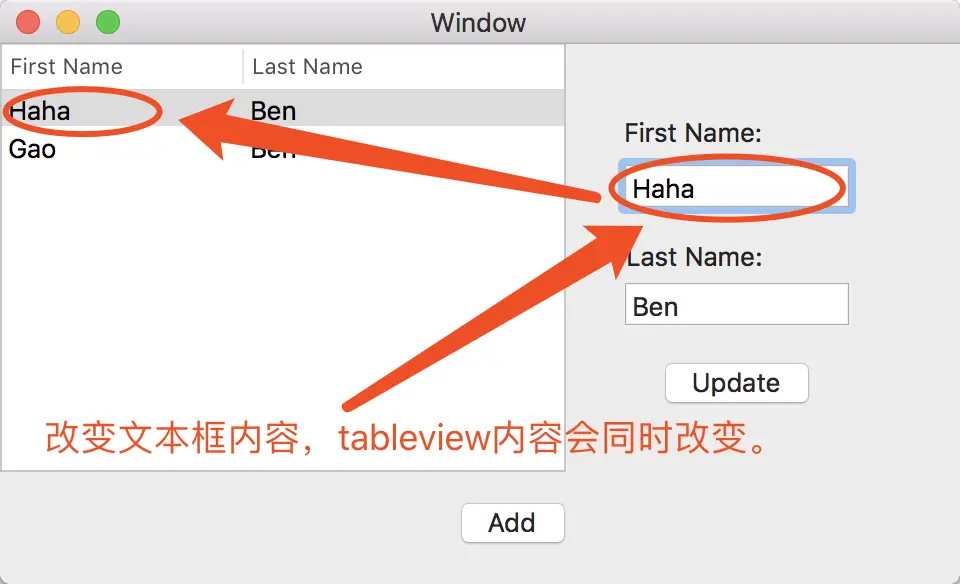
一步一步熟悉Mac app开发(十)之Cocoa Binding
概要
阶段一、实现数据的在table view上的显示、增加。(复习ArrayController)
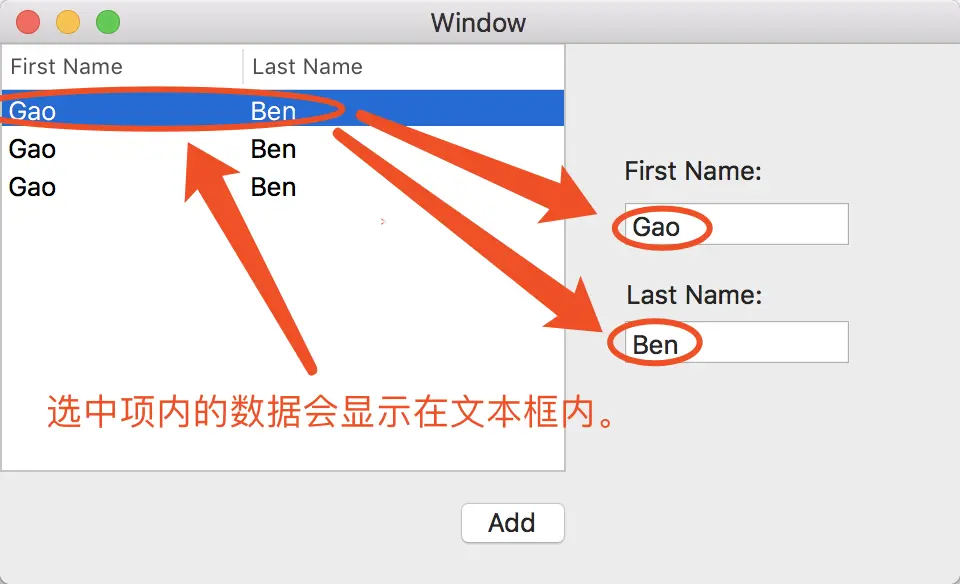
阶段二、通过使用tableview的委托方法tableViewSelectionDidChange来实现将选中项的值赋给文本框。
阶段三、通过使用文本框的委托方法controlTextDidChange实现table view内数据的动态修改。
阶段一 数据的显示与增加
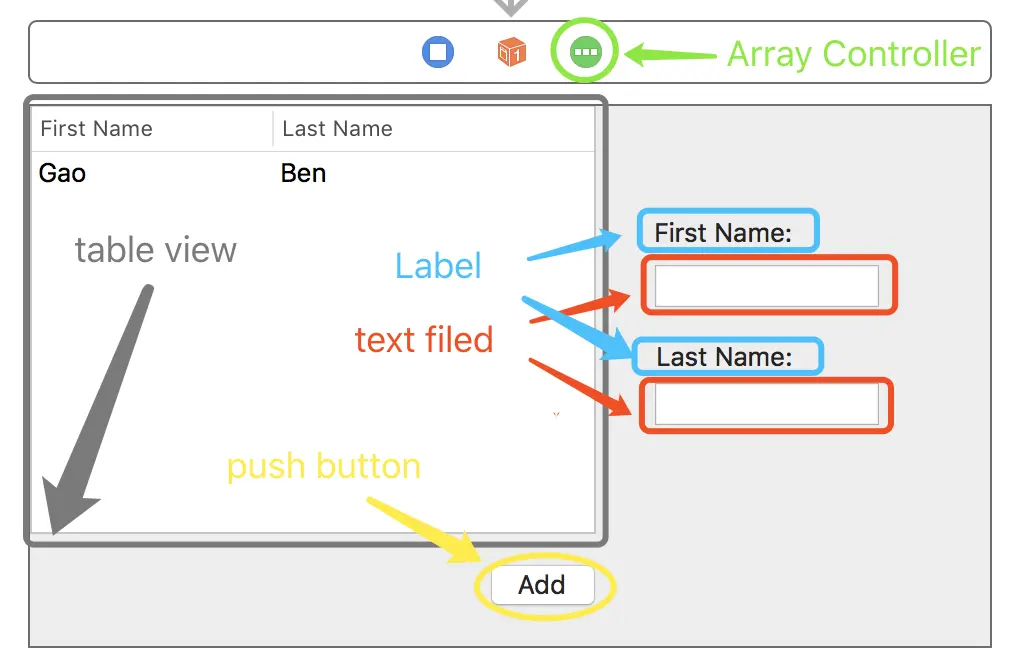
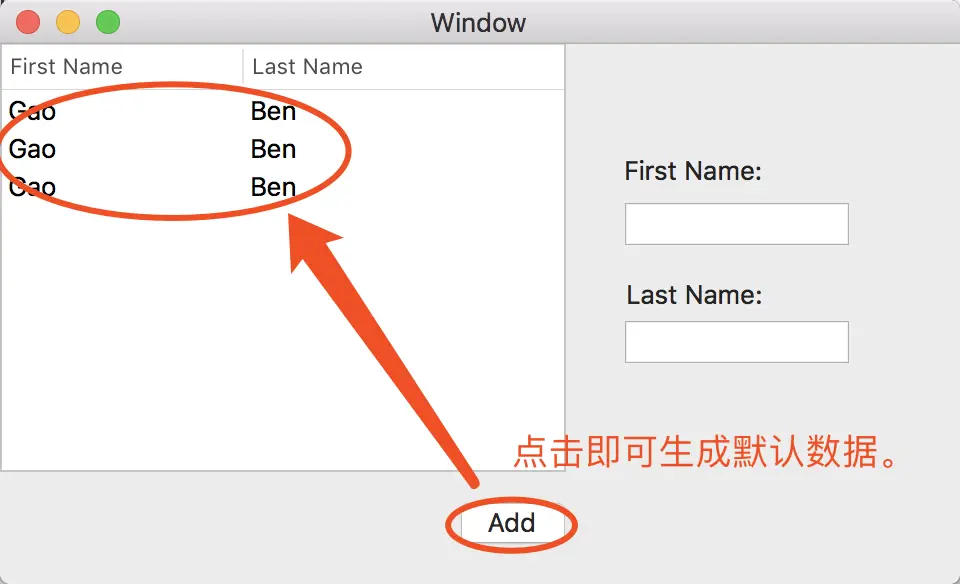
1、新建工程,打开StoryBoard,添加Push Button、Text Filed、Label、Array Controller、Table View等。
2、创建一个NSObject的子类User,并为其添加firstName与lastName成员。
//User.h
#import <Foundation/Foundation.h>
@interface User : NSObject
@property NSString *firstName;
@property NSString *lastName;
-(instancetype) init;
@end
//User.m
#import "User.h"
@implementation User
-(instancetype) init{
    self = [super init];
    if(self){
        self.firstName = @"Gao";
        self.lastName = @"Ben";
    }
    return self;
}
@end
3、向ViewController.h中添加NSMutableArray类型的成员变量users并在ViewController.m中对其进行初始化。
//ViewController.h
#import <Cocoa/Cocoa.h>
#import "User.h"
@interface ViewController : NSViewController
@property NSMutableArray<User*> *users;
@end
//ViewController.m
- (void)viewDidLoad {
    [super viewDidLoad];

    // Do any additional setup after loading the view.
    self.users = [[NSMutableArray alloc] initWithCapacity:32];
}
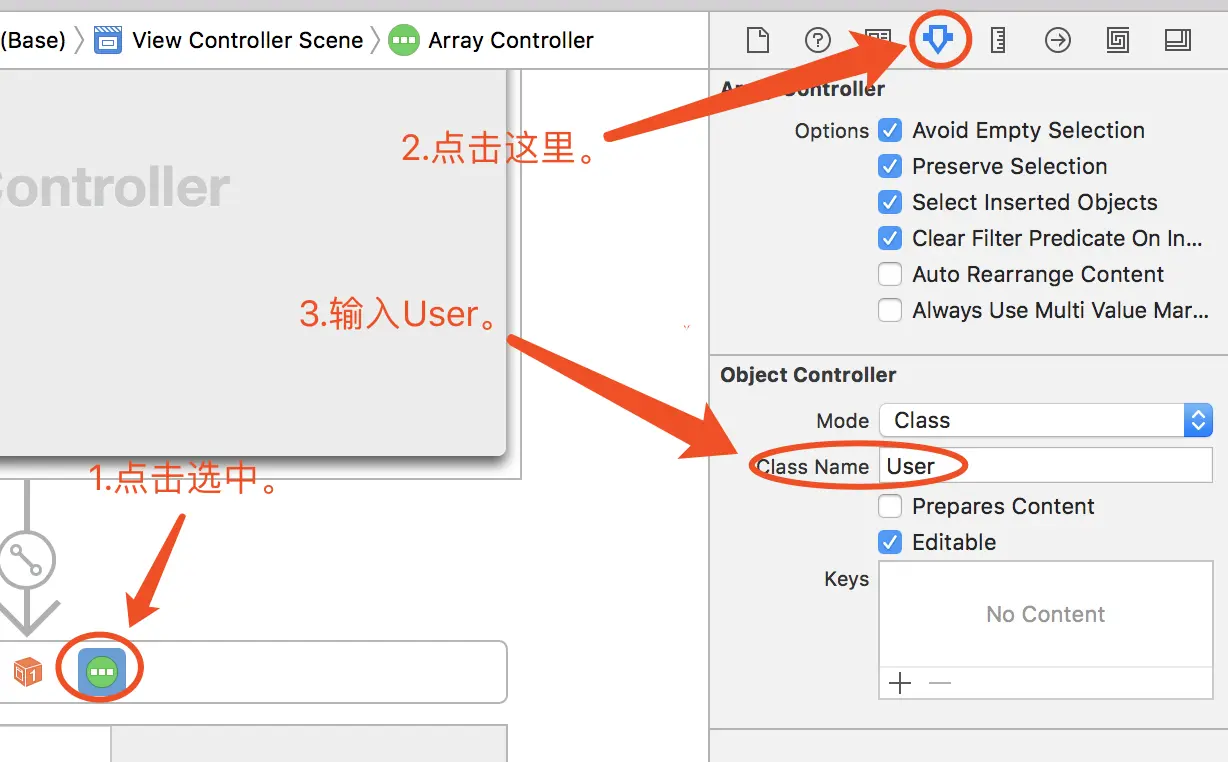
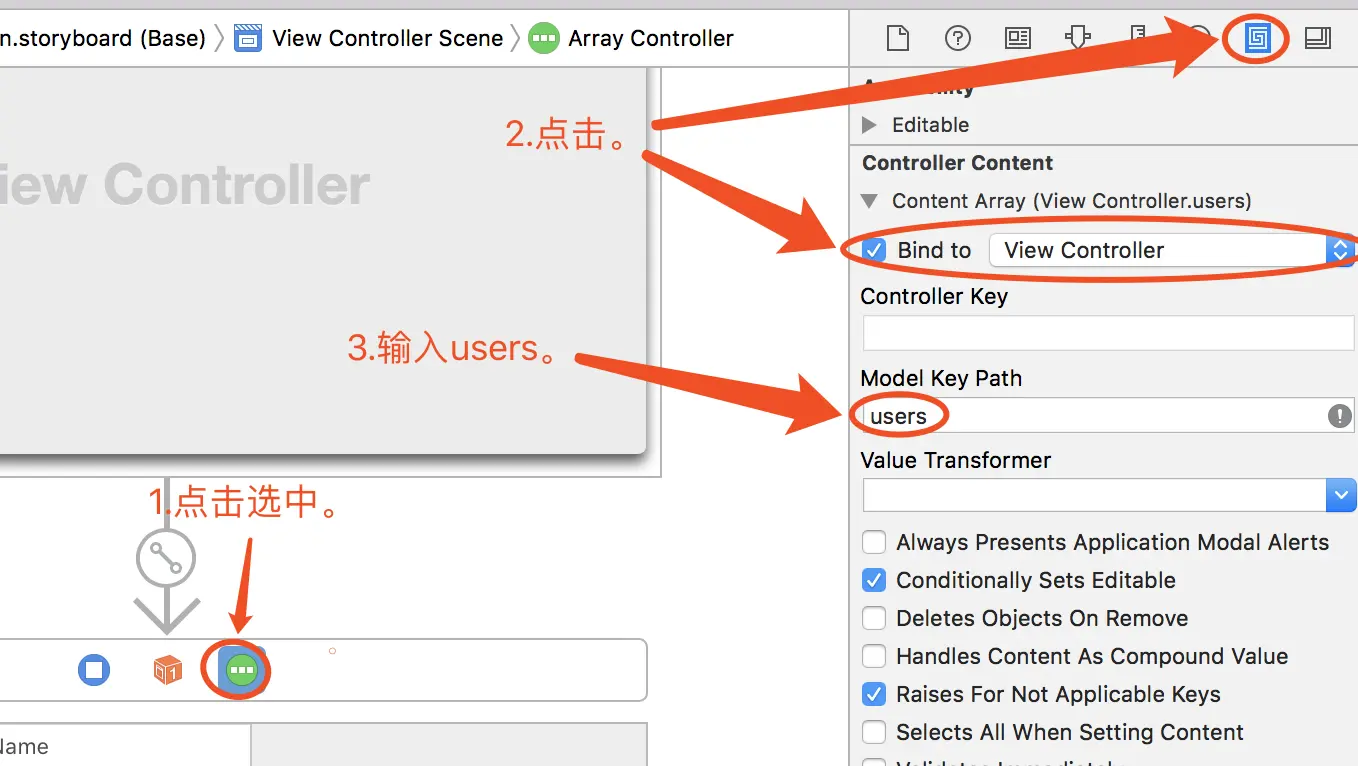
4、打开StoryBoard,设置Array Controller的Object Controller中的Class Name为User,将Array Controller的Content Array与ViewController的users进行绑定。
5、将Table view的Table Content与Array Controller进行绑定,并将Add按钮与Array Controller的Add方法进行绑定。
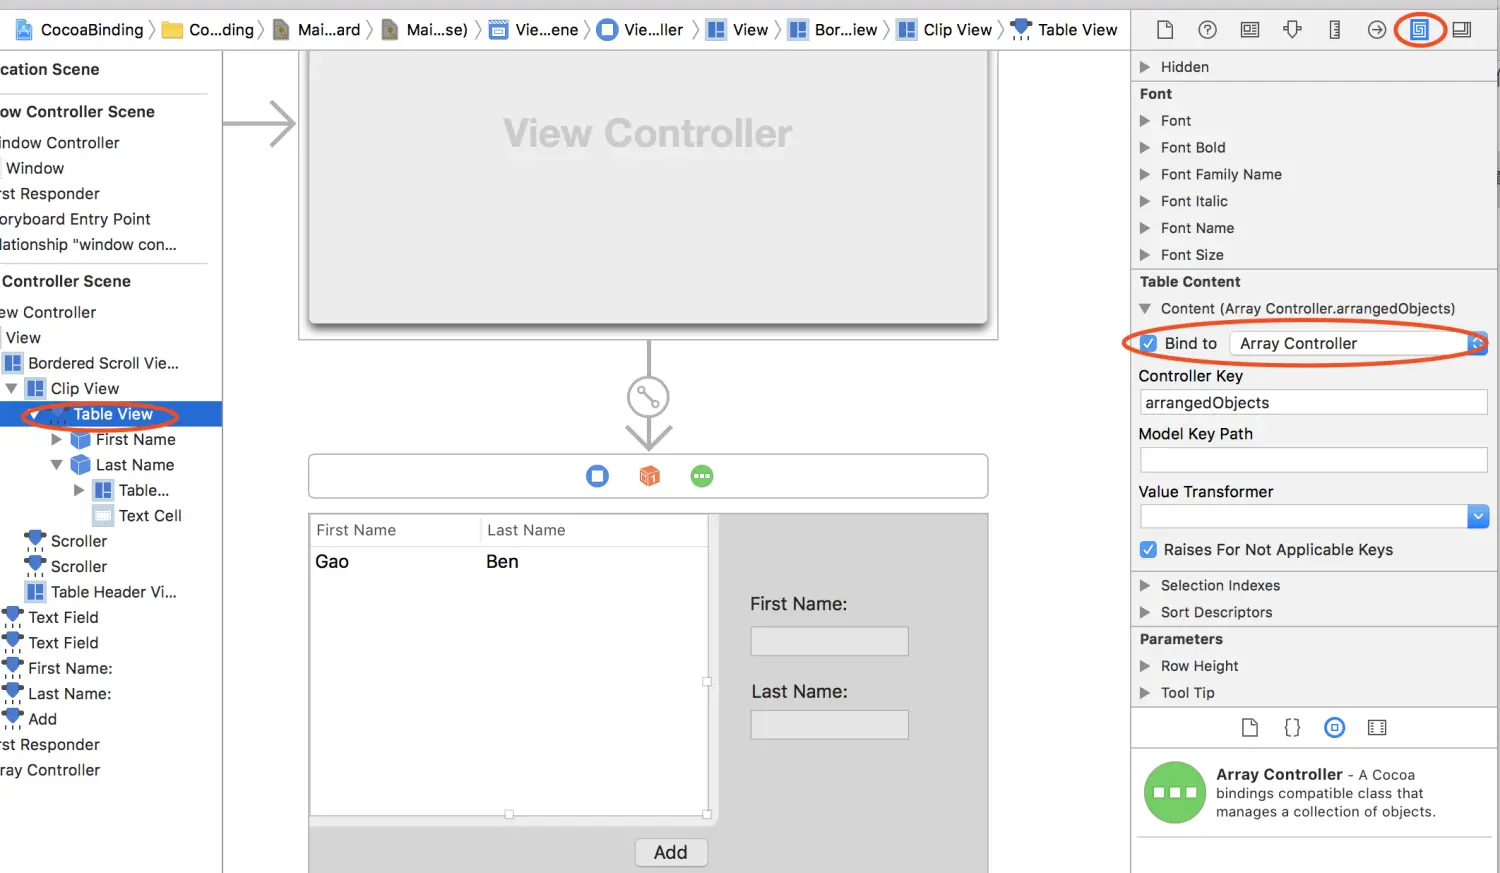
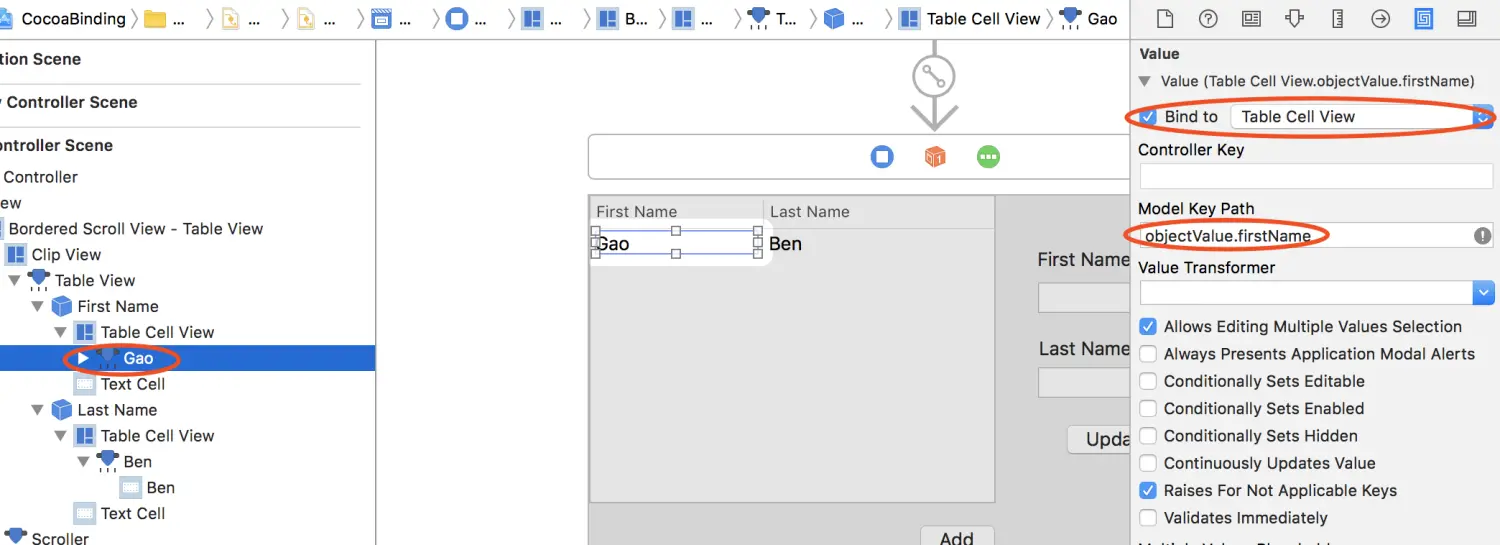
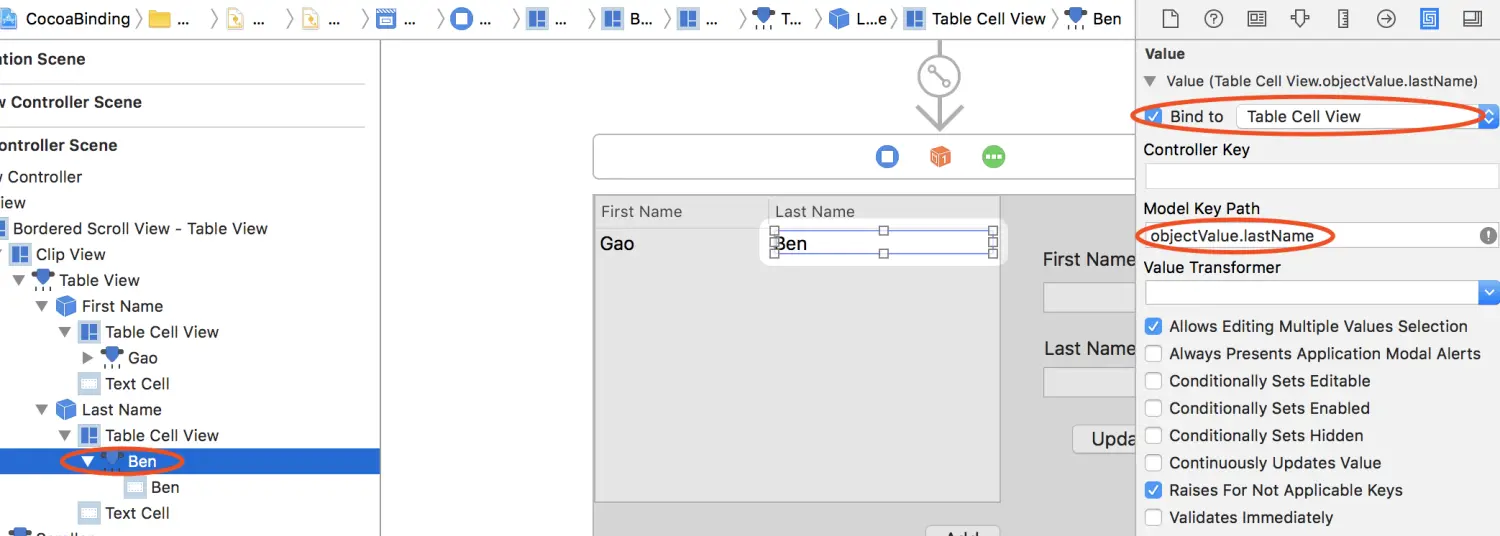
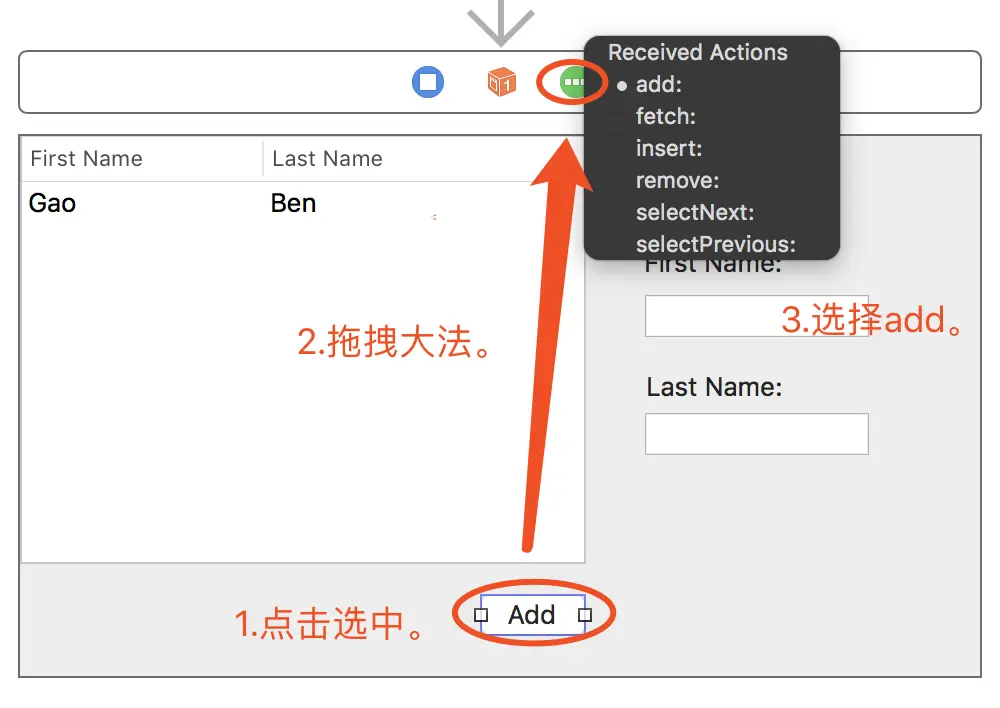
6、阶段一完成,效果如下。
阶段二 选中项处理
1、将table view与两个text filed拖拽大法至ViewController.h中,并添加NSTableViewDelegate协议,拖拽细节省略,代码如下。
#import "ViewController.h"
#import "User.h"
@interface ViewController()<NSTableViewDelegate>
@property (weak) IBOutlet NSTableView *tableView;
@property (weak) IBOutlet NSTextField *text_firstName;
@property (weak) IBOutlet NSTextField *text_lastName;
@property  User *currentUser;
@end
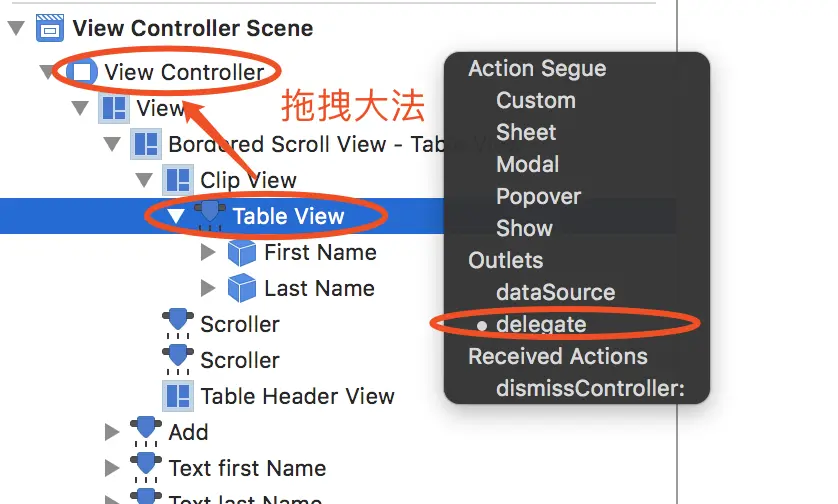
2、设置table view的delegate为View Controller,并实现其委托协议方法。
- (void)tableViewSelectionDidChange:(NSNotification *)notification{
    if(self.tableView.selectedRow < 0){
        self.text_firstName.stringValue = @"";
        self.text_firstName.stringValue = @"";
        return ;
    }
    self.currentUser = self.users[self.tableView.selectedRow];
    self.text_firstName.stringValue = self.currentUser.firstName;
    self.text_lastName.stringValue = self.currentUser.lastName;
}
3、完成,效果如下。
阶段三 数据的动态修改
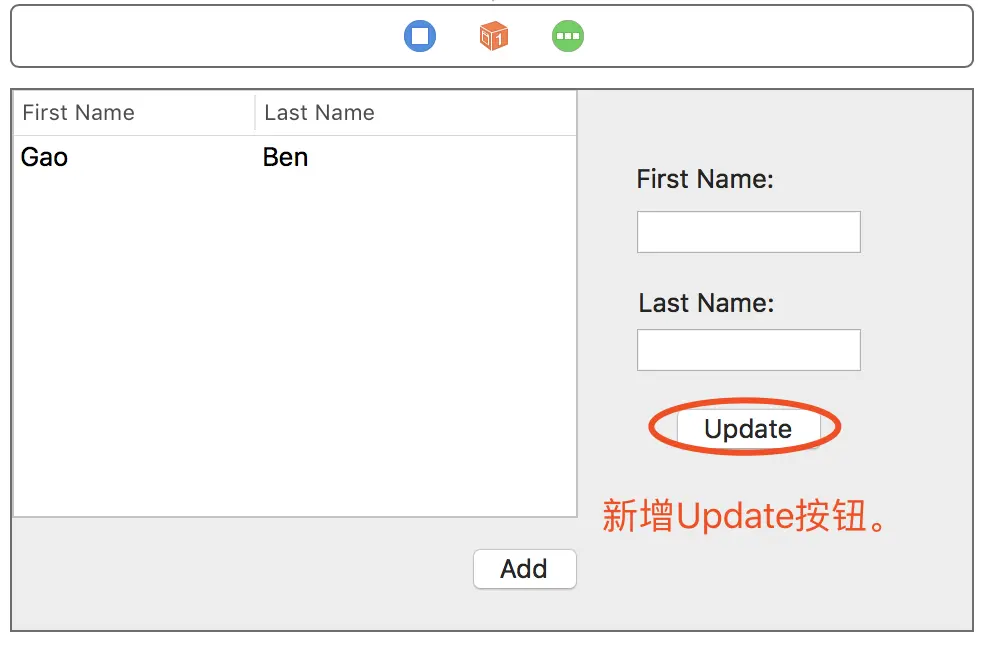
1、新增“Update”按钮,拖拽大法至ViewController.m内,命名为btn_update。
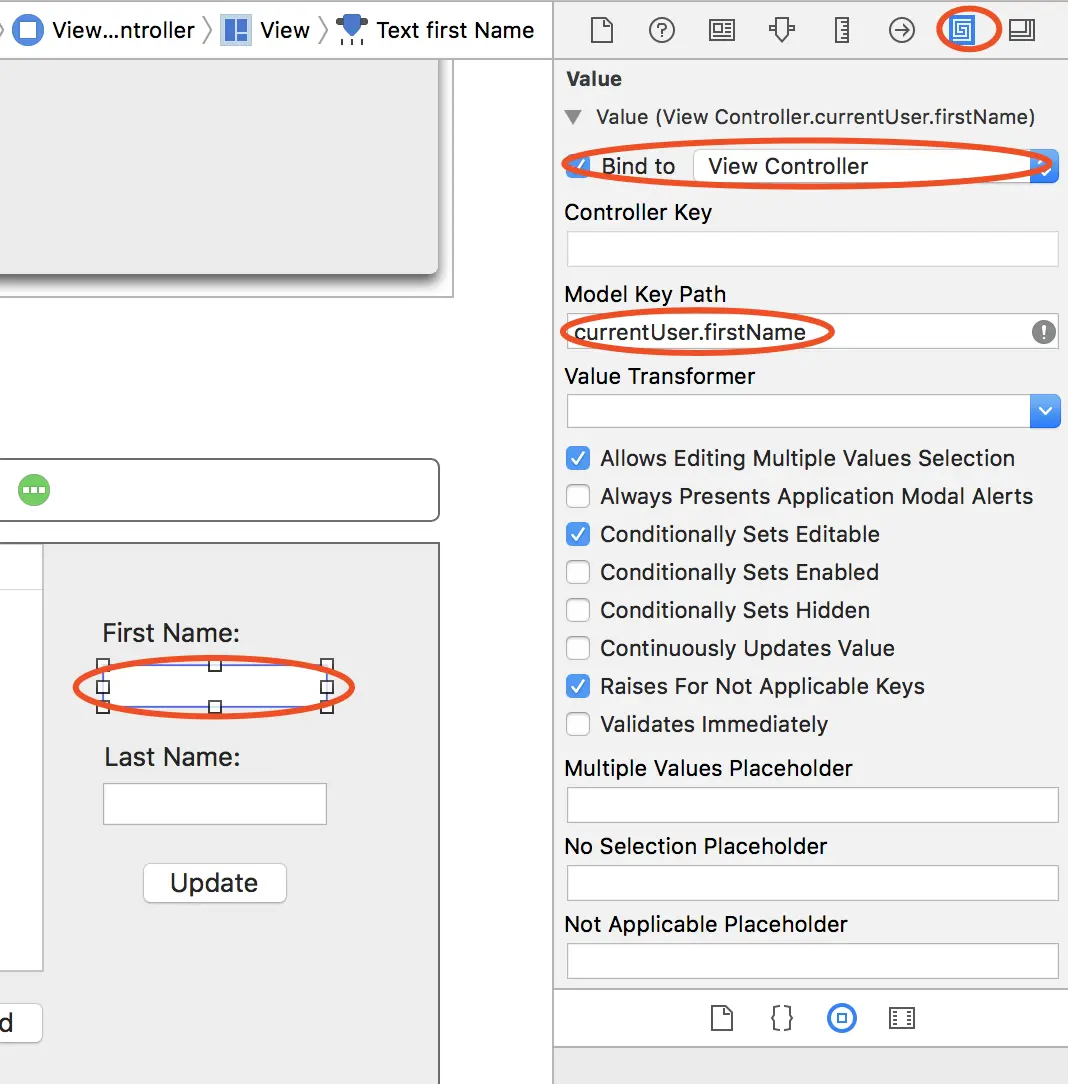
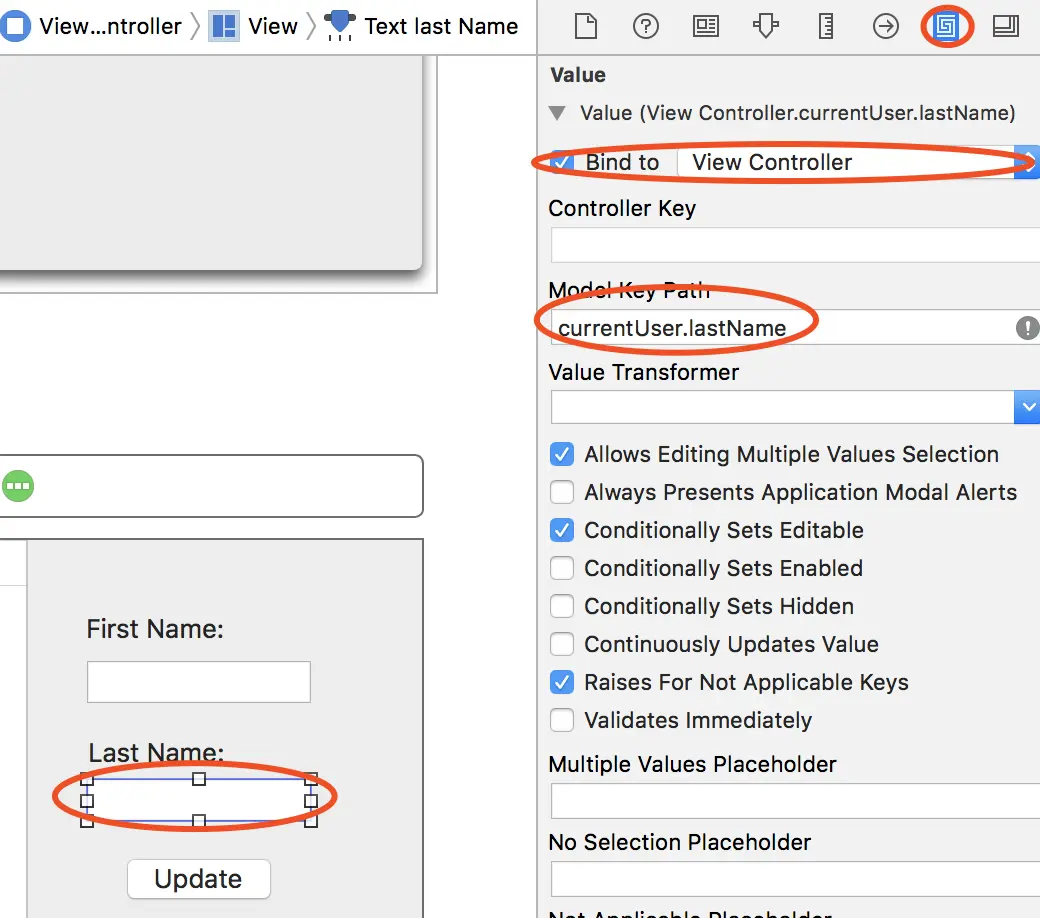
2、将表示First Name的文本框与currentUser.firstName绑定起来,将表示Last Name的文本框与currentUser.lastName绑定起来。
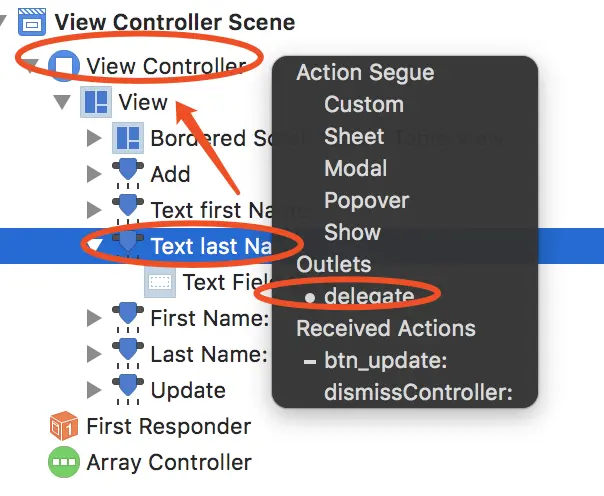
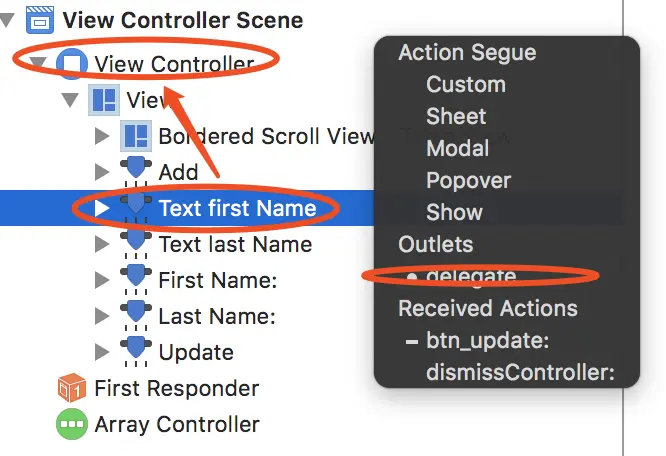
3、将First Name文本框、Last Name文本框委托给View Controller。
4、在ViewController.m中添加临时委托协议NStextFiledDelegate,并实现controlTextDidChange方法。
#import "ViewController.h"
#import "User.h"
@interface ViewController()<NSTableViewDelegate,NSTextFieldDelegate>
@property (weak) IBOutlet NSTableView *tableView;
@property (weak) IBOutlet NSTextField *text_firstName;
@property (weak) IBOutlet NSTextField *text_lastName;
@property  User *currentUser;
@end

@implementation ViewController
//new
- (void)controlTextDidChange:(NSNotification *)obj{
    self.currentUser.firstName = _text_firstName.stringValue;
    self.currentUser.lastName = _text_lastName.stringValue;
}

- (IBAction)btn_update:(id)sender {
    //多余的更新按钮
    NSLog(@"%@ %@",self.currentUser.firstName,self.currentUser.lastName);
}

- (void)tableViewSelectionDidChange:(NSNotification *)notification{
    if(self.tableView.selectedRow < 0){
        self.text_firstName.stringValue = @"";
        self.text_firstName.stringValue = @"";
        return ;
    }
    self.currentUser = self.users[self.tableView.selectedRow];
    //self.text_firstName.stringValue = self.currentUser.firstName;
    //self.text_lastName.stringValue = self.currentUser.lastName;
}

- (void)viewDidLoad {
    [super viewDidLoad];
    //4C3TJ-8XH4K-MPQCM-R6C4X-P3C9D
    // Do any additional setup after loading the view.
    self.users = [[NSMutableArray alloc] initWithCapacity:32];
}

- (void)setRepresentedObject:(id)representedObject {
    [super setRepresentedObject:representedObject];
    // Update the view, if already loaded.
}
@end
4、完成,效果如下。
